This covers most of the basic wire colors used on Airheads. As the electronics got more complex, more combinations came into play so it’s possible a few of the more obscure ones may see other uses. Always double check factory wiring diagrams, and yes, even they can have a mistake or two. PowerBoxer.de has a copy of the Haynes ones. And here’s a link for more about Airhead relays and terminal designations.
Headlight Switches & Headlight Relays
This article was originally written (and since then, expanded/edited numerous times) because someone asked about the left-hand switch of BMW Airhead motorcycles if using higher powered headlight bulbs. He did not understand why the existing stock headlight relay would not automatically eliminate wear on the switchgear. The simplified reason is that the stock headlight relay does not do what many think it does, at least on most, especially later, Airhead models. Variances of his question have come up many times, often on the Airheads LIST, but also on various other forums, and even for other BMW models.
It is important to know that the main purpose of the stock headlight relay FROM 1978 is to turn off the headlight, leaving the dash lights and rear running lamp on, during the time the starter motor is cranking the engine. The relay turns off the headlight during cranking, and that’s all.The stock headlight relay from 1978 also does not do theswitching between high & low beams. NOTE that the high beam flasher (‘passing lamp’) function remains, due to a green wire from the ignition switch, as a separate circuit. The headlight relay may or may not turn off the headlight, during engine cranking, depending on year, model, & country shipped-to. On some Airheads, the high beam flasher button (‘passing lamp’ function) MAY be available with the ignition off. It is a matter of where the green-colored wire goes to. It is easy to move a green wire at the ignition switch, and thereby have the ignition be ON, but the headlight OFF, in the PARK function, but there is more to this, and this is not the point of this article.
Using additional relays to control higher-powered headlamps (stock is 55/60 watt) is a must; although some have gotten away with not doing so for some time. Note that the left bars switch assembly is fairly expensive. It is not designed to handle high-powered headlamps, and it would have been, …perhaps, …better if a relay had been used by BMW to handle all the current flow to the low and high beams. This is not difficult to accomplish, and such as the Eastern Beaver kit does it. With that kit installed (or, your own two relays), the bars light switch(s) would only pass current to the extra relay’s COILS. This means that using accessory relays will reduce wear on the left switchgear even with the stock headlight; and usually will increase light output slightly due to a more direct current path from the battery to the relay. This increases the headlight voltage to closer to battery voltage….another way of saying this is that a more direct power path reduces wire and some switching losses.
Sources for appropriate relays are any auto-parts store. However, www.EasternBeaver.com sells complete plug and play kits for your motorcycle, and they may even still have a version with a modulator if you wanted that.
Basic Electricity 101+
The below article was written to furnish THREE types of information:
(1) CONSIDERABLE amount of BASIC & SLIGHTLY ADVANCED INFORMATION on electricity & Airhead problems. The approach used here is probably different than in most manuals & troubleshooting guides. Although some hints are given in this article on some common faults, this article should be used in conjunction with my other articles, particularly: http://bmwmotorcycletech.info/electricalhints.htm
(2) Common problem areas, explanations of some of the circuitry. A discussion of such as batteries; starter motors, voltage regulators, etc. Other articles will get far deeper into these things.
(3) An addendum that may discuss particular points that has come up, or some topic of interest. Some is at the very end of this article.
Available to you are certain helpful booklets from such as Motorrad Elektrik, Chitech, Haynes and/or Clymers manuals (and, perhaps, a schematic in the rear of your owners booklet or on the Snowbum website). In my opinion the Chitech electrics manual and the owners book or factory schematic, or schematics on the Snowbum website (and some elsewhere’s, and I have links to these on the Snowbum website), are THE BEST sources for electrical information for the Airheads.
I recommend you at least purchase at the Chitech Electrics Manual. The Chitech (Chicago Region BMW Owners Assoc.) BMW Electric School Manual is THE BEST manual for BMW electrics, from basics to full-blown technical details, components, diagrams, etc., & includes the singles & all Airheads; even some on the /2 era. It is VERY complete. Only a few errors, for which i wrote an article/Critique: http://bmwmotorcycletech.info/chitechelmnl.htm
See http://bmwmotorcycletech.info/url.htm for more information on Chitech, and how to order their publication. Some of the total-bike schematics are not reproduced well, that is the only substantial problem with that manual. Get the manual anyway.
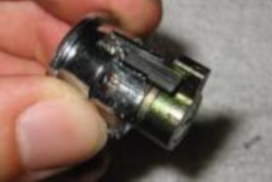
Rekeying a Seatlock
Recently I had occasion to replace the seatlock in my R100, which was old, and rotated in its housing, making it hard to actually lock the seat. I checked in with my local dealer, and they said I could get a generic lock, with a matching key, for $23, or I could get a matched lock (set up to work with my existing key) for $50 and 3 months wait.
I decided I’d rather spend $23 and practice my locksmithing skills. This is an article describing how to do the same thing, while hopefully avoiding a few of
the mistakes I made in the process.
Take a look at this page in general (lock picking) and particularly page 5 from that series for some good visualizations of how a pin-and-tumbler lock works. This is the type of lock used in the seat of the R100 (and probably many other similar vintage Airheads).
Overview
This procedure is broken down into 4 basic parts: getting the lock out of the bike, getting the pins out of the old lock, putting them in the new lock, and putting the lock back in the bike. While the specifics of installation, removal and pin-access may not apply to other locks on the bike (or in general), the rekeying steps can easily be applied to other locks.
Without any instruction, it took me about 30 minutes to do the actual rekeying, having spent 15 minutes beforehand, removing the lock. Reinstalling the lock took about 10 minutes, but would have taken less if I’d kept the seat on (I wanted to take pictures). I think it’d take most people 30-45 minutes to do the whole thing if you read through and understand these instructions.
The Procedure
I’ll describe this in a step-by-step method, referring to pictures as appropriate. Click on pictures to enlarge them. Comments about what I did are in italics.
Step One: Remove the lock from the bike
The seat latch mechanism is attached to the bike by
way of two long screws that thread into the same plate that holds the side handle and the latch button. The heads aim back towards the tire/center of the bike. It’s easiest to take off these screws with a very short #2 phillips head screwdriver, but a longer one will do. Just unscrew them, and the latch box and cover will come off in your hand.
The lock is secured to the bike with a metal ring, that’s then attached to the body lock with a single screw. The screw is a #1 Phillips screw, and is best taken out
with a fairly short screwdriver again. Once the ring is removed, the lock body should fall out pretty easily. I accidentally messed up the small screw on my lock by using too large a screwdriver. It eventually came out, but was pretty well unusable.
New Keys for Your /5
I recently finished going through the process of reviving a 1973 R75/5. One of the challenges I faced was that of missing keys. Sure, the ignition nail key was there, but the keys for the seat lock and the steering head lock were missing. I needed to remove the lock for the fork in order to complete frame painting, and really wanted matching keys for both the seat and fork locks if at all possible. This precluded me from simply drilling it out. I was pretty sure that the locks were original to the frame, and that the keys should be the same for each.
So, here is what worked for me…
First, go to your local dealer and buy a few correct key blanks.
Remove the seat lock mechanism, and detach the lock housing. Don’t lose the small screw that holds the lock to the striker mechanism.
Take the blanks to a competent locksmith and ask them if they can make an impression cut key. Keep looking for someone who will give it a try. Now, just so you know, I was advised that they might damage the lock mechanism while making a key in this manner. If they (or you) are uncomfortable making an impression-cut key, the lock may be disassembled and the tumblers opened up for their key making efforts, but it is critical that they get the pins back together in the same order to have the fork lock work with this key.
OK, we’ll assume that you have a key that works with the seat lock cylinder. You will try it in the fork lock and, surprise, it won’t work!! Here’s what to do:
Look at the key that you have. You should see four valleys in the key blank, which were cut by the locksmith. You will also notice that they are evenly spaced along the key, and also that there is room on the end closest to the handle of the key for another cut to be made. Starting at the end of the key furthest from the handle, we’ll refer to these as cuts #1, #2, #3 and #4. The trick is that the seat lock uses four tumblers, and the fork lock uses five. You will need to cut the last one, #5, yourself.
Bike Storage Preparation
It’s that time of year again, so I thought I would post the storage procedures that are contained in the 1978 BMW Owner’s Manual for those of you that don’t have access to such. The following is a reproduction of the storage procedures specified by BMW on page 35 of the 1978 BMW Owner’s Manual:
If you intend to lay up your motorcycle during the cold season of the year or for a long period, the following precautions will help to guard against corrosion and superficial damage:
Drain the oil when the engine is warmed up, clean the oil mesh strainer and oil sump.
Add corrosion inhibiting oil up to the lower mark on dipstick (app. 1 Liter = 1.05 US quarts). Run the engine for about 1 minute off-load. Remove the oil filter and close the empty filter chamber. When storing for more than 6 months, drain oil from gear-box, swing arm and final drive and add corrosion inhibiting oil. Contents: gearbox 0.4 liter (0.4 US quart), swing arm 0.05 liter (0.05 US quart). Place the machine on its center stand, engage 2nd gear and turn the engine at a fast idle for a few seconds.
Albert Mirrors
.pdf diagram of assembly and parts for the SPORT mirror:
AlbertBarendPartsDiagramSport.pdf
.pdf diagram of assembly and parts for the TOURING mirror:
AlbertBarendPartsDiagramTouring.pdf
Cleaning Exhaust Systems
Cleaning Exhaust systems:
Pipes, headers, mufflers, etc., can all be cleaned with 0000 grade of steel wool. Use of 000 grade should be reserved for the worst cases. Exhaust pipes polishes to reduce bluing are available, most do little, and the bluing tends to come back soon. A particular problem is that exhaust systems tend to get oily grunge & other fun stuff such as burned boot heel material on them that gets thoroughly baked onto the surface. Late model Airheads have pre-muffler/collectorson which can can be ‘wire brushed’ with a steel or brass wire wheel/brush, but they are more abrasive to the surface. Brass bristled brushes are safer. Wire brushes may be your last resort if items are truly a big mess, this is particularly so if your items are chrome plated steel & are “rusting”. Strong chemical means, which will not eat the metal like steel brushes will, work well for heavily baked-on oil/grease/etc. I HIGHLY recommend the entire process be done OUTDOORS.
Clean off any oil/grease you can, with a petroleum solvent. Kerosene; paint thinner; Stoddard solvent; MEK; Acetone; whatever you have. Wash with very hot water & strong dish washing detergent mixture. If the items are still mounted in your bike, you want to mask off, by whatever good means, the bike from the next step. You do NOT want any aluminum castings getting strong ‘oven cleaner’ on your castings, etc.
Obtain a spray can of OVEN CLEANER. Get ONLY the type containing sodium hydroxide (common household lye). Rarely, these days, you might find potassium hydroxide, it is also OK. NO OTHER TYPE of chemicals but these two provides seriously strong chemical cleaning against burned-on grease/oil. Sodium bicarbonate is NOT going to work hardly at all.
If you can, warm the parts to be cleaned. The hotter the parts, the faster the stuff works…but, NEVER higher than water boiling temperature. YOU ABSOLUTELY MUST WEAR SAFETY GOGGLES!! If any spray gets on you, WASH IT OFF, right now, NO waiting. KEEP IT OUT OF YOUR EYES. Try hard NOT to breathe the spray. Spray the surface generously. DO NOT BREATHE-IN, WHILE SPRAYING. How fast the chemical works depends on temperature and that it remains wet. It is OK to use a foggy spray of water to keep the chemical wet, if it is showing signs of drying. In particularly egregious cases you want a thick layer plus you want it covered so it will stay wet, perhaps overnight. The chemical must be wet. It is better to do this job with the parts off the bike, but that may be inconvenient. After a while, perhaps 15 minutes or longer, wash off very thoroughly with water. Use a stiff floor scrubbing type of brush or modify a stiff paint brush by shortening the bristles so it is even stiffer. If the wet surface feels soapy/slippery, it is not washed off enough.
19 inch FRONT Snowflake Wheel Recall
UPDATE: The silver replacement wheels are no longer available (36-31-1-238-959). Gold wheels are available and the recall will be honored. 36-31-1-238-960.
19 inch FRONT CAST ALUMINUM SNOWFLAKE wheels were recalled. NOT 18 inch front wheels. NOT 18 inch rear wheels. Recall is ONLY for certain AIRHEADS 19 inch front cast aluminum snowflake wheels.
I still hear occasionally about an old recalled wheel that is still in service. There was a BMW factory recall on SOME FRONT 19″ cast snowflake wheels, & only those! Supposedly a U.S. Federal Recall Campaign never goes out of date. The RECALL is world-wide, & there are specific recall campaigns in the various countries. BMW will provide the recall service, as described in this article, for the BIKE, the bike identification is needed……..AFAIK! I have yet to hear of/from anyone who brought in a wheel to be exchanged & the wheel was not tied to a specific bike identification. You could be the first to tell me the details!
Improved ATE Braking
From the Airheads mailing list
I see a question and comments about improving front braking on a 1978 R80 from a single disk to dual. One person said go to brembo brakes.
It can be done, but prepare for a snowflake front wheel, the spoked one won’t fit with Brembos. Also you will need the later model down tubes as the attachment of the dampeners is by different means. So you just can’t replace the lowers. (But you can use the originals, if one can get some parts machined).
The wheel cylinders were of different sizes, there are some 38 MM units and some 40 mm units, the 40s give more brake power, the R75s and 80 had 38s. The R100 units and later (75 – 76) and R90S had 40s. So look at the cylinders, it is stamped on there some where. You can’t go by colors, some are silver, some black, the blue anodized ones were 40s probably they came on the 77-79RS.
