Recently I had occasion to replace the seatlock in my R100, which was old, and rotated in its housing, making it hard to actually lock the seat. I checked in with my local dealer, and they said I could get a generic lock, with a matching key, for $23, or I could get a matched lock (set up to work with my existing key) for $50 and 3 months wait.
I decided I’d rather spend $23 and practice my locksmithing skills. This is an article describing how to do the same thing, while hopefully avoiding a few of
the mistakes I made in the process.
Take a look at this page in general (lock picking) and particularly page 5 from that series for some good visualizations of how a pin-and-tumbler lock works. This is the type of lock used in the seat of the R100 (and probably many other similar vintage Airheads).
Overview
This procedure is broken down into 4 basic parts: getting the lock out of the bike, getting the pins out of the old lock, putting them in the new lock, and putting the lock back in the bike. While the specifics of installation, removal and pin-access may not apply to other locks on the bike (or in general), the rekeying steps can easily be applied to other locks.
Without any instruction, it took me about 30 minutes to do the actual rekeying, having spent 15 minutes beforehand, removing the lock. Reinstalling the lock took about 10 minutes, but would have taken less if I’d kept the seat on (I wanted to take pictures). I think it’d take most people 30-45 minutes to do the whole thing if you read through and understand these instructions.
The Procedure
I’ll describe this in a step-by-step method, referring to pictures as appropriate. Click on pictures to enlarge them. Comments about what I did are in italics.
Step One: Remove the lock from the bike
The seat latch mechanism is attached to the bike by
way of two long screws that thread into the same plate that holds the side handle and the latch button. The heads aim back towards the tire/center of the bike. It’s easiest to take off these screws with a very short #2 phillips head screwdriver, but a longer one will do. Just unscrew them, and the latch box and cover will come off in your hand.
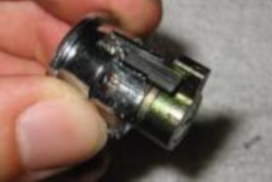
The lock is secured to the bike with a metal ring, that’s then attached to the body lock with a single screw. The screw is a #1 Phillips screw, and is best taken out
with a fairly short screwdriver again. Once the ring is removed, the lock body should fall out pretty easily. I accidentally messed up the small screw on my lock by using too large a screwdriver. It eventually came out, but was pretty well unusable.
