Primer on Using Heli Coil® Inserts
DISCLAIMER: About a week ago I responded to a thread on the Airheads list dealing with the repair of a stud that had stripped out the thread. Someone mentioned that the information should be made available to others and asked if I would write up some of the do’s and don’ts of installing Heli Coil® inserts. I guess I do have a vested interest in that I sell Heli Coil® products in the Upper Mid-Western States but my purpose in writing up these comments is purely educational. Please contact your local sources for these products; I am available for questions. Please note that Heli Coil® is a registered trademark of the Emhart Corporation.
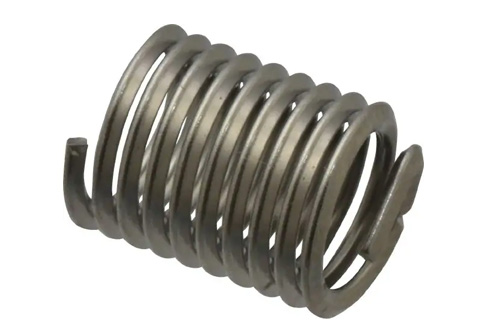
BACKGROUND: Heli Coil® inserts are made from 18-8 stainless wire, have a diamond cross section with a hardness of Rc 43-50, an ultimate tensile strength of from 200kpsi to 250kpsi and a surface finish of between 8 and 16 microinches. The final product is larger in diameter than the tapped hole. During installation the insertion tool applies torque to the insert reducing the diameter of the leading coil allowing it to enter the tapped hole. After installation the insert expands outwards with a spring force that permanently anchors the insert in place. The product was invented in the late 1930’s to provide a solution for the repair of aircraft engines, especially the threads to attach spark plugs and ‘jugs’. The stainless steel insert has a temperature range of from -320F to +800F.
SIZES, TYPES & MATERIALS: There are two designs; the STANDARD which has a free-running thread and the SCREW-LOCK which provides a locking torque on the mating fastener using “chords” on one or more coils of the insert. Available sizes are from #2 to 1 ½ inches in both UNC and UNF threads (each size has 5 different lengths available) and metric M2.2 to M39 in both coarse and fine threads (5 different lengths). Inserts are normally made from 18-8 stainless but other materials are available on special order. Lengths of inserts are referred to in diameters. A ¼-20 insert that is 0.250 long is a 1-diameter insert. (NOTE: Free state measurements of an insert are not valid due to the ‘spring’ nature of the parts.)
WHY USE HELI COIL® INSERTS: The most common use of HC® inserts in older machinery is to repair threads. Properly installed, a HC® insert will bring the hole back to its original thread size, i.e. if the threads on a M12x1.75 tapped hole are stripped, they will remain an M12x1.75 tapped hole after the installation of the insert. There is an added benefit in that the use of the insert yields a much stronger assembly than did the tapped hole in the parent material. For example, if the shear strength of the parent material is 10kpsi, the use of a 2 diameter insert would allow the use of a 54kpsi bolt with assurance that the bolt would shear before the threads would strip out. More details are available in Heli Coil® Technical Bulletin 68-2. Another way of looking at it is that if the Heli Coil® insert were part of the original design, you probably would not have to repair that stripped thread. The reason for this is that in a conventionally tapped hole, the first three threads carry 90% of the load of the assembly. With the Heli Coil® insert, the load does not change but due to the geometry and forces in the insert, the load is spread over all of the coils of the insert. Thus, if you had a load of 100 ft-lbs., a standard tapped hole would see about 30 ft-lbs. on the first three threads while each of the threads of a 10 coil Heli Coil® insert would only see 10 ft-lbs.
HOW TO INSTALL Heli Coil® INSERTS: The following comments are intended for installation into steel and aluminum. The installation of the inserts is a four-step process. First you have to drill out the old thread, then TAP the hole using an STI (screw thread insert) tap, install the insert with the appropriate installation tool until it is approximately ½ to ¾ of a pitch below the surface and finally break off the driving tang. If you purchase a Heli Coil® kit from either an automotive parts store or an industrial distributor, it will contain all of the tools that are needed. The tapping process is not complex since the tap wants to follow the predrilled hole and is removing relatively little material – just keep it parallel to the center line of the drilled hole. You will require only minimal forced to achieve the desired results. NOTE: The taps used, regardless of the style of tap, MUST be marked with the STI identification because this tap is cutting a hole that is larger to accommodate the extra thickness of the insert. DO NOT use roll form or forming taps. Use of this type of tap to prep a hole for a Heli Coil® installation will cause problems virtually all of the time especially when using fine threads. A Heli Coil® Brand tap will carry a marking consisting of a part number, size, fit and the STI notation. Breaking off the driving tang can be accomplished in a number of ways. In the smaller threads, the easiest way is to obtain a piece of drill rod slightly smaller that the ID of the insert, insert it until it comes in contact with the tang and then tap it with a hammer. The tang will break off. In larger inserts, it may be easier to grasp the tang with pliers or gripping tool and then work the tang up and down until it breaks off. GAUGING OF FINISHED HOLES: The mil spec that governs the installing of wire inserts states that gauging of the tapped hole prior to installing the insert defines whether or not the hole is properly prepared. Attempting to gauge a hole after the insert is installed renders useless data and can cause problems since the insert is not seated until the installation of the mating fastener and if the fastener is removed, the insert will attempt to return to its original state.
HOW TO REMOVE WIRE INSERTS: Assuming that the installation was ‘by the book’ there are a couple of ways to remove inserts after the tang is broken off. If the tang is still in place and you do not have a blind hole, just drive the insert out of the hole using the installation tool. For those ‘real world’ situations, you have two choices. The first is with a tool available from Heli Coil® that essentially is a triangular shaped metal form on a stick which is attached to the base of the triangle. The two sides are sharp and you tap the handle after inserting the point into the center of the hole containing the wire insert. Then simultaneously push down on the handle and turn the tool counterclockwise. As soon as you can see some of the insert, stop the rotation and grasp the wire with pair of pliers. Then UNTHREAD the insert by continuing the left-hand rotation until it comes out of the hole. This will SAVE the original thread and avoid further damage. IF you just pull the insert out you will damage the threads since the insert is harder than the parent material. IF a tool is not available and the working space allows, use a pick of some type (dental etc) and pull the first thread of the wire insert out of the tapped thread towards the center of the hole just far enough to grab the loose end with a pliers of some type. THEN unthread the insert by turning left until it comes out.
USE OF STUFF THAT COMES IN TUBES: Do not use anything except possibly a very small dot of graphite lube on the mating bolt to prevent galling, especially if the bolt is made of stainless material and you are using a SCREW-LOCK insert. Use of Lok-Tite® and other similar products do not work in this type of application and cause the insert to generate less clamping strength if the material becomes trapped between the OD of the insert and the tapped hole. It also causes the removal of the insert to change from just a PITA to a large PITA.
TYPES OF KITS: There are two styles of kit available. One is referred to as an automotive kit and is distributed through stores that cater to automotive parts. The other style is a MRO kit (maintenance, repair and overhaul) that is distributed through Industrial Distributors who deal with machine shops, manufacturing companies, etc. While the inserts in both of the kits are the same, the tools in the automotive kits are intended for basically a one time use; the MRO kits have substantially better tools and have more lengths of inserts – generally a 1, 1 ½ and 2 diameter length, and come in a reusable plastic case. As you would expect, the automotive kits are less expensive. MRO kits are also available that contain a predetermined selection of sizes of inserts along with the supporting tap, installation tool, tang removal tool and inserts all contained in a nice molded plastic package. OVERSIZE AND TWIN-SERT KITS: These kits were designed to provide a solution for ‘bigger’ thread problems, ones that cannot be corrected using the normal STI kit. The OVERSIZE inserts are made of larger diameter wire for a given thread size, the TWIN-SERTS are actually two specially made inserts, one of which is installed into a prepared hole and the second is installed into the first insert yielding a much larger correction. These are normally used in industry in industrial salvage of parts that have been incorrectly manufactured. The maximum correction varies by thread size. They are not cheap. If you think you need one of these kits, contact your Heli Coil® distributor or the Factory first. Kit pricing varies depending on the size of the insert. MRO kits run from about US $30.00 to over US $150.00 for the kits with a variety of sizes. Automotive kits will run less and do not offer kits with multiple sizes to the best of my knowledge.
