Since joining the Airheads shortly after purchasing my first-ever Beemer in October of 2001, I’ve found the AirList to be an invaluable source of information and direct feedback as I learn my way around my new 1984 R100RS. One of the first things I do when acquainting myself with a new mount is a basic tune-up. Lurking on the Airlist provided a bunch of helpful tips to supplement (and correct) the tune-up info in the Haynes and Clymer manuals.
One of the slickest tune-up tips I came across was Tom Rowe’s mention of a ridiculously cheap and easy-to-build differential manometer (vacuum gauge) for balancing carburetors on vacuum port equipped Boxers. I’d read about the Twin-Max (aprx. $80) and have used the $40 CarbStix on my 4-cylinder Hondas, but for less than $4, I was able to build a twin carb synchronizer that is 16 times more sensitive than my mercury vacuum gauges and can be assembled from common materials available at almost any hardware store. I built it and my R100RS loved it – it really smoothed out some bands of footpeg/bar/mirror vibration that the bike had, even after using the CarbStix.
I posted a ‘Thank You’ note for the idea on the AirList after I tried it and got even more valuable feedback from Jay Carpenter and a request from John “Beetle” Mailleue, ABC# 5657 to write a tech article for the AirMail. After spending some more time in the garage incorporating Jay Carpenter’s ideas, I figured I’d go ahead and write-up a description of how to build and use the $4 Carb Synchronizer, because it REALLY works. Super cheap, super accurate, super easy to build and super easy to use – CLASSIC Airhead technology!
Credit for the original idea has to go to Marty Ignazito of the powered-parachute crowd, he came up with the idea to balance the twin Bings on a two-stroke Rotax and his original write-up is at www.powerchutes.com/manometer.asp. If you try this idea and like it, send Marty a thank-you e-mail at mdipe@mcleodusa.net.
Here’s the Materials List for the $4 Carb Synchronizer Tool:
20 feet of clear plastic (vinyl) tubing – inside diameter big enough to slip on the vacuum nipple of your carb (3/16″ i.d. worked for my bike, but it’s tight, maybe 1/4″ i.d. might be better). 15 cents per foot in the plumbing section at my local ‘big box’ hardware store, Sutherlands.
A yard stick – Home Depot sells an aluminum yardstick for under $2, but you can make a perfectly satisfactory gauge with a 3-foot piece of 1″ wooden lathe for next-to-nothing. (For a ‘professional’-looking gauge, I actually used a yellow aluminum 4-foot rule, but that was wretched excess at $5.)
3M/Scotch/Whatever – clear mailing/packaging tape. You should have some of this left over from the Christmas mailing season; otherwise around a $1 a small roll (and you won’t need much).
2 short nylon zip-ties – You should have these in your garage. If not, buy them in bulk for cheap in the wiring section of Home Depot, Sutherlands, Ace Hardware, etc. – you’ll use them and wonder why you didn’t have them before.
A tiny amount of automatic transmission fluid – Actually, just about any fluid works, including used motor oil, colored water, 2-stroke oil, etc. I chose ATF because I already had a gallon of it and (most important) it is really thin and is RED (which looks WAY cool as the indicator fluid against my fancy yellow ruler) and ATF won’t hurt the engine if it accidentally gets sucked in the carb’s vacuum port. (ed. note: 90W Tranny fluid works well and because it’s thicker – it’s less likely to get sucked into the carb.)
Building the Balancer
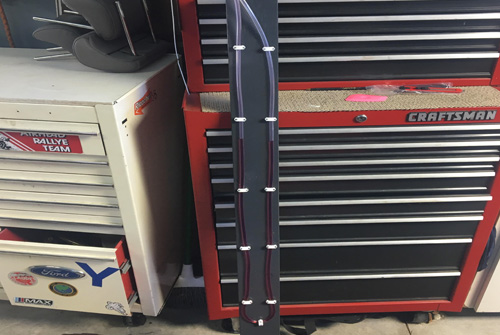
Fold your 20′ of vinyl tubing in half and mark the center point. Lay your yardstick down flat on a convenient work surface (kitchen table or floor). Place the center point of the tubing at the bottom end of your yardstick (there is generally a hole at the top end of the yardstick – put the center-bend of your vinyl tubing at the opposite end of the yardstick from that hole). Carefully run the tubing up each side of the yardstick, making sure that the tubing makes a smooth, non-kinked bend at the bottom.
Use the clear packing/mailing tape to fasten the tubing in place on either side ( left and right ) of the yardstick. Thread the zip-ties through the hole at the top of the yardstick and snug the left and right side tubing to the respective sides of the ‘stick with the zip-ties. You should now be able to hang your yardstick from the hole in the top ( I use a bungee suspended from a hook in the garage ceiling). The tubing runs around the perimeter of the yardstick and about seven feet of tubing hangs down from the left and right sides of the ‘stick. I fold a piece of tape around each end of the tubing like a little flag and mark the left side with an “L” and the right side with an “R” using a magic marker.
Now, put one side of the tubing in the container of automatic transmission fluid and, using the other side of the tubing like a drinking straw, suck ATF fluid about three feet up into the tubing. Maintaining suction for a second, pull the tubing out of the ATF container and then raise BOTH ends of the tubing above the top of the yard stick. Temporarily fasten both ends of the tubing high enough that the ATF drains down to the loop at the bottom of the yardstick. I recommend leaving it overnight so that all the bubbles, etc. work their way out.
Continue reading