The four TRANSMISSION OUTPUT FLANGE BOLTS CHANGES;…split lock washers, updates, …and….pushstarting!
© Copyright 2021, R. Fleischer
https://bmwmotorcycletech.info/drvshftboltstoolstorque.htm
47
Background and History on these 10 mm 12 point bolts and lockwashers used at the transmission output flange:
The earliest bolts for the /2 & the Airheads (transmission output flange-to-universal joints) had steel split-type lock-washers, & were not torqued as tightly as the later non-lock-washered ones (20-22 footpounds was generally used, but there were some even lower specifications quite early-on). All these early lesser-torqued bolts would not have stretched, unless considerably over-tightened. If you greatly over-torqued the bolts …considerably beyond 30 ftlbs I think …you might even break them or damage the flange threads area, besides stretching threads. BMW had problems with the lockwashers failing, and changed to shorter bolts, without using lockwashers. BMW also increased the torque settings.
For the Airheads, in an emergency ‘in the field’, with none of the later shorter BMW bolts being available, I would re-use the old bolts and with new hardware store lockwashers if I had to, until I could replace the bolts with the new shorter ones, used without washers. You could have serious problems if even just one washer cracks or breaks or has spread slightly during tightening …it can allow bolt loosening & has been known to happen well after assembly….the result being serious damage to the back side of the transmission. It is acceptable to tighten those bolts with a hand wrench & not a torque wrench for Field Situations, that is, you are on a ride/tour, & have a reason to tighten the bolts. So, how do you tighten these special headed bolts if no torque wrench? Use a 12 point box wrench wrench that fits the cramped area and is about 6″ long; use “a good grunt” on the bolts using that wrench. You probably already have that particular wrench, it is somewhat thin-looking but not fragile. Here is the description from my tools article
https://bmwmotorcycletech.info/tools.htm 71-11-1-237-847 10 x 12 box end wrench, which replaces 71-11-1-230-579.
To measure the bolts length to be sure you have the correct ones, measure the distance from the underside of the head to the end of the bolt. The official book value on the old bolts, 26-11-1-230-414 was 14.5 mm (actually measured by me at 14.4 mm or 0.568″). These were the longer ones that were used with the troublesome lock-washer 07-11-9-930-840. Never reuse these lock-washers, unless an emergency. If you absolutely have to reuse these old longer bolts, install new lock-washers, even if from the hardware store….and change to the later bolts, without lockwashers, at first oppotunity. NOTE that both early and later bolts as described herein, are special, and are also specially heat treated for strength.
The new bolts, that began being used in 1983, are 13 mm, part number 26-11-1-242-297. That means a 1.5 mm (0.059″) difference, officially. The bolts will actually measure almost exactly 1/2 inch; or, for the metric folks, 12.7 mm and a real difference of 1.7 mm. These very slightly shorter bolts must be used if the lock washer is not used. Do not use the original longer bolts in an emergency without washers, as the seal may be damaged, located behind the transmission output flange.
Could you shorten the original bolts & use them without the split lockwasher? Yes, but you must not heat the bolt much during the grinding-shortening. The bolts are very tough hardened metal, but ….you do not want to change their heat treatment by getting them quite hot. So, if shortening the longer ones, do a small bit of grinding at a time, allowing plenty of cooling between grinding attempts. If the temperature of the bolt during grinding is hotter than you can comfortably hold in your bare hands, it is likely too hot. Do not leave messy sharp threads, etc., at the end.
BMW says, in some literature, that at 29 ft lbs, the bolt stretches. I do not believe that; I think it takes a fair amount more. An explanation is that BMW could be correct, but I believe that at 29 footpounds the bolt stretch, if any, and I’ve never seen any, is not permanent.
Some manuals & literature have the torque at 18 foot-pounds on the /5 models; 27.5-31 foot-pounds for the 1977-80 models; 29 for the 1981 models. Note that these were before the 29 specified by BMW in 1983. The last of the Airheads, owners manual, says 35 +- 3 Nm, which is 26 +- 2 foot-pounds, I agree with that; and believe that is also OK with good reused bolts, as well as brand-new ones. I personally set my accurate torque wrench at 25 foot-pounds; and, as noted in this article, I use a drop of threadlocker chemical. As far as reusing the new shorter bolts, if not stretched, and the threads look good, I have seen no problems.
Do not use red Loctite or any quite ‘high strength’ threadlocker, as they require a lot of heat to loosen & remove a bolt. Using any Loctite (Snowbum uses one drop of a medium holding Loctite, usually just called Blue) gives some added insurance. Don’t compensate for the Loctite. Have the bolt clean and dry before adding any Loctite.
It was in 1983 that BMW eliminated the lockwasher, as many had broken (even back in the /2 days). The result of just one even very slightly loose bolt was that the bolt would continue to loosen….and soon all 4 were loose. Soon the U-joint & transmission flange parted company. When the flange and U-joint parted company, the rear of the transmission could be torn off. I had personal experience with a few of these as the Chief Technician for a dealership. This happened to an almost-new R60/2 bike; which is how I purchased it so cheaply (well, the owner was disgusted….)!
The original longer bolts, with the split lock-washers, at one time had a tightening specification of only 17-19 ftlbs. The major problem with split-lock-washers is the washers are capable of spreading during the bolt tightening; they are also brittle, & can crack. Generally, German companies, and BMW especially, seldom if ever now use split type lockwashers anyplace.
Ever since BMW changed the bolts and eliminated the split lockwashers, there has been misinformation. I have been informed a few times by various owners that their BMW dealership parts departments personnel stated that BMW has either gone back to the washer design; or, at least some dealers are/were selling the original bolts & lock-washers. Due to a factory parts guy’s screw-up, see just below, any information about a reversal to the old style longer bolts and using split lockwashers again is NOT true. Only the new shorter bolts are to be used, without washers of any type.
| I have no intention of mentioning my source for this information:
Some time after the bulletin came out [Factory Service Information bulletin (S.I.) June 1983 26 005 83 (2078)]; BMW discovered that they had a large amount of the old longer bolts & washers in stock, a BMW factory parts guy decided that it would be a good idea to write & distribute a “Parts Bulletin” recommending that they be used for the pre-1980 models; he vanished from BMW shortly thereafter because the warranty claims started coming in again. |
You will have numerous occasions to remove or check the tightness of the 4 bolts (a special 12 point type) that fasten the forward end of the Airhead Motorcycle driveshaft universal joint to the transmission output flange. This can be for removal of the transmission for a transmission input spline cleaning & lubrication (but, see next paragraph); or, perhaps for a transmission overhaul, or a new clutch or crankshaft output seal, oil pump seal ….or some other reason, including replacing the rubber driveshaft-to-transmission boot, & just checking those bolts. You do not want them to loosen!
Removing the U-joint bolts is not needed for a simple transmission input shaft cleaning & re-greasing (aka ‘clutch splines’), if the transmission is left in the motorcycle and moved backwards some. It is a good idea to schedule a checking of the tightness of the four U-joint bolts at regular intervals. For that purpose, never loosen first, just check in the tightening direction.
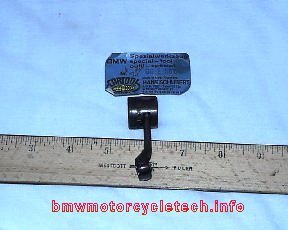
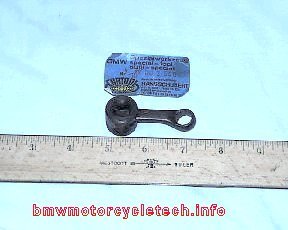
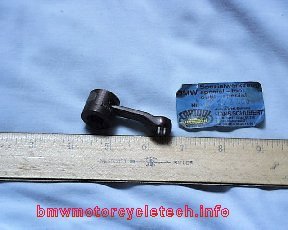
BMW tool 88-88-6-002-560 (or equivalent) allowed a torque wrench to properly fit the driveshaft bolts at the transmission output flange. Usually considered a “home” tool. The BMW-sold tool consists of a 3/8″ square drive female part with a slit in the side. Pressed & brazed into that slit is a 12 point 10 mm off-set box end wrench. That wrench was simply a double ended wrench of some sort, cut to be shorter, one end discarded. Crude! See photos below. When using this tool, typical is to use it straight-out with the torque wrench, not at any angle to the torque wrench. The center-to-center distance of the working ends of this tool, compared mathematically to the distance between the working center of the torque wrench square drive & the center of pressure of the torque wrench handle, will determine the setting (that will be lower than the torque wrench setting). The official maximum torque amount was 29 foot-pounds, on clean and dry threads. In all instances except use at 90°, the torque wrench will be set to less than 29 ftlbs if the wrench is used straight out. If the tool is at 90° to the tubular torque wrench, there is no correction needed. You can use the BMW standard tool kit dual box wrench (10/12mm), with your glove to protect your hand, & get 29 ftlbs, which is my maximum for you. I am OK with 25-29, I use 26. While ‘a good grunt’ on any hand wrench on these bolts “will do”, the result will be highly variable; and I do not think that is safe enough, because you do not want to overstress the bolt; and, you absolutely do not want it loosening. I prefer, and highly recommend, that you use a real torque wrench, with an adaptor.
Have the male and female threads clean & dry & then place one drop of Loctite blue (that is a medium strength type), or you can substitute Napa 765-1140, on the threads.
HINT! ….if you don’t want to purchase a -560 tool, or a Snap-On adapter, or adaptor of some sort such as shown below, here is how to get by for no cost:
Dig into your tool drawer for a combination 10 mm wrench. That means it has a 10 mm 12 point box end and the other end is an open wrench. If you are lucky, you have a more rare wrench, that is 10 mm box at one end and 11 mm box at the other end. If the other end is a 10 mm open end, simply use that with the 3/8″ drive of the torque wrench, and do not let it slip out while in use. If you use that wrench as an adaptor with your torque-wrench, straight out, you must reduce the torque wrench setting, in accordance with the method shown in my torque wrench article (with notes on being sure). If you use the wrench as an adaptor with your torque wrench but at 90 degrees to the torque wrench, you need not do calculations, just read the value off the torque wrench. If you have the rare 10mm/11mm dual box end wrenches, the 11 mm box end fits the 3/8″ square drive of the torque wrench!
I prefer either of the two tools below, or its home-made equivalent. Using a known good torque wrench setup is best. Three photos here of the genuine factory tool, the -560 type offset wrench. The 4th photo, of the flat tool, is a small & simple tool, available from cycleworks.NET, that will work well for you. You may have to use a fine file on the square hole in the Cycleworks tool to have it fit your torque wrench perfectly; which can take awhile, as the wrench is very hard material. It is 1.5 inches center to center; and, as mentioned, hardened metal, which I think is laser-cut. I owned both of these tools, and the actual real BMW -560 tool that I owned was simply a square female drive with a slot, with a box wrench piece in the slot. That actual tool is simple; and these photos are from my tools article & descriptive information at https://bmwmotorcycletech.info/tools.htm. The tools work very nicely with a torque wrench. For years I used a 10 mm 12 point BMW tool/adapter… an old number for it was 88-88-6-002-560, manufactured by Hans Schubert in Germany for BMW; there may have been other makers at various times. Mine was sold with marking as “00-2-560”. The price in my 1995 BMW book was $54.58 retail and $32.75 dealer cost. That was pricey, even way back then. It is true, see prior paragraph, that one can use a double ended box wrench, & then an Allen adapter to your square drive on the torque wrench. There is a BMW combo box wrenches with 10 mm on one end & 12 mm on the other end. You must either use that wrench with a goodly grunt; or, use it with a torque wrench; calculate the reduced torque wrench setting (unless the usage is at 90°). There is also a rarer BMW wrench with a box end of 11 mm that fits a 3/8″ square drive torque wrench, and the other box end is 12 point and 10 mm, so it will fit the bolts in question.
Here is how to do the calculations for your torque wrench:
https://bmwmotorcycletech.info/IncTorqWr.htm

There have been instances in which someone has questioned just what BMW means by its torque figures. This question arises now and then for other areas of the bike, not just the output flange bolts. This questioning is usually because using a torque wrench at a limited clearance area of such as the driveshaft U-joint flange bolts requires an adaptor, see above 4 photos, which “can” add to the working-length of the torque wrench, increasing the actual torque on the bolt from the value set on the torque wrench……unless the adaptor is used at 90°. My torque wrench article describes using extensions more precisely; but, here I will add brief commentary. When this question comes up, it almost always is in regards to the tightening method for the 4 driveshaft bolts, that hold the U-joint flange to the transmission output flange. BMW’s torque figures are the value on the bolt itself, whether or not you use an adaptor from the torque wrench to the bolt. This is standard for industry, & this applies unless specifically noted to be different by the manufacturer. BMW never made this clear & BMW’s own wording can be wrongly interpreted.
The factory specified torque is what is to be applied to the bolt, & you must calculate the adjustment factor for the torque wrench if the adaptor is not used at 90°. In every instance, where the adaptor extends the working distance of the torque wrench, the torque wrench will need to be set to a value less than the value of the actual torque you want applied to the bolt head. I suggest that if you use the adaptor, you use it at 90° (which is a bit awkward); or, straight-out with the calculated correction value. Any angle besides those two requires trigonometry calculations. To make this 100% clear, if you use the adapter straight out from the torque wrench, you must do calculations, but if at 90° no special calculations are needed.
If you are just checking to be sure the 4 bolts are tight; try tightening them, using the setup of your choice, see prior paragraphs. If even slightly loose, remove, inspect the bolt, & if OK & screws in smoothly with fingers, then clean the bolt and flange threads so they are clean & dry & use one drop of Loctite BLUE (#242 or equivalent Napa as noted). Replace the bolt(s) if you think they could have been stretched, or otherwise been damaged, or if you just want to be absolutely sure the bolts are OK. If you have lock washers, remove them, replace the bolts with the later shorter type, which appear almost the same, but are very slightly shorter. Apply the drop of threadlocker onto clean, dry threads. Do not install washers of any type! Don’t bother to take into account that Loctite is a mild lubricant. I have already done that for you by suggesting 26 ftlbs, instead of specifying the maximum, which is generally thought of as being 29 foot-pounds.
If you fail to use the shorter bolts after removing the lock-washers, you can damage the area behind the flange.
If the flange was totally loosened & U-joint separated (for a new boot, etc.), then evenly tighten in a cross-pattern, in torque stages. Be sure the surfaces are clean & totally undamaged by nicks, particularly at the edges, before reassembly. It is important that the flanges have no metal, not in the slightest, sticking up anyplace that would prevent the flanges from coming totally, flatly, together. Failure to follow this advice can result in massive damage, if the flange ‘disconnects’ from the transmission; which happens if forces cause the bolts to loosen.
The threads on the bolts & in the flange should be oil-free (clean & dry). This is per BMW; & I agree, except that I suggest you use a drop of the Loctite mentioned, and use my specified torque at the bolt itself. BMW has places where they say to replace these bolts (non-washered type) every time they are removed. I personally do not always do that; what you do is up to you. What I do is to visually inspect them under a magnifier, and if OK appearing, I then screw them in with my fingers; if they do that smoothly then I assume they have not been stretched (check especially just under the head) …and then I reuse them, with 1 drop of the threadlocker after cleaning the male & female threads with a quick evaporating solvent. Do not spray any solvents into the transmission flange threads; instead, use a Q-tip or equivalent, moistened with solvent. Don’t use Q-tips that have cores of plastic. I do not want strong solvents to get on the seal behind the flange, hence the no-spraying.
The bolt could have had some stretching just beneath the head & not in the engaging threads, which would not necessarily be revealed by my screw-in test (less likely, but still possible with the 10X loupe look), so this is your decision here as to using new bolts, or not. Certainly new bolts should be the safest. If you use new or used bolts, do measure the length and do inspect them.
When just checking at regular intervals for tightness, unscrewing first to check & then re-torqueing for tightness is not a good idea ….it breaks any existing Loctite bond, adds to wear; & you are then re-torquing on used hardened Loctite, which changes things somewhat. If a bolt is removed then I look at the bolts, threads, and at the sharp point of shank to head, beneath the bolt head, using my 10X eye loupe ….I look for almost microscopic cracks or other distress. I have never had a re-used set of these bolts break ….nor loosen ….that I personally installed. YMMV!
PUSH-STARTING….Bump Starting:
The transmission output flange is a taper fit to the transmission output shaft. This is why bump starting is a poor idea, although acceptable, but I suggest never trying it in first gear (and probably not second gear, unless careful).
Forces on the flange & bolts are quite substantial, especially during shifting gears or sudden braking. The actual transmission of power is in two primary places (without getting into other areas of the transmission, clutch, etc.):
(1) Via the flange contacting area….yes…by the flat surfaces ….but those are pressured together by the 4 bolts under discussion in this article ….which carry a shear loading as well.
(2) Via the taper fit of the output flange to the output shaft. The fit, under severe stress, can slip, damaging the surfaces.
If you simply must …or have to push-start …also called bump starting if done by jumping aboard during the pushing, it is best done in 3rd gear, not first gear, and potentially marginal in second gear. While one reason is that 1st or 2nd might cause the rear wheel to slip and not transmit enough force to rotate the engine properly …it is also easier on the flange taper to not use sudden very high shock forces when suddenly engaging the clutch. You do not want the taper fit to slip ….that usually damages it. Sudden shock loading is also hard on the universal joint and its bolts. If you are on dry pavement, and are careful, you can use 2nd gear.
Some additional references:
REFERENCE-1: BMW Factory Service Information bulletin (S.I.) June 1983 26 005 83 (2078)
REFERENCE-2: http://www.gunsmoke.com/motorcycling/r100rt/transmission/
There is a fair amount of information in the article by Scot Marburger, about the output flange bolts, threads, & theory about threads.
Revisions:
01/27/2018: All prior revisions since 2003 incorporated, article edited and revised for additional clarity, etc., for use in airheads.org
05/15/2018: Minor torque clarifications.
02/21/2021: Minor clarifications; and, later the same day, add the 4 missing photographs.
© Copyright 2021 R. Fleischer
