Speedometer Repair for BMW Airheads
Thanks to all esp. Paul Glaves, Jeff Saline, and Randy Mallon
After some probing I found the upper RT silver gear that transfers drive from the total mileage to the trip odometer to be loose on the shaft and causing the trip odo to run intermittently. Using minimalist approach and a tooth pick I first carefully dipped the toothpick in alcohol and cleaned the shaft without disassembly. Steady hands and a watchmakers magnifying loupe helped. When that dried I put a drop of liquid crazy glue an a piece of plastic and using a toothpick I dipped it in glue and than transferred small amount to the shaft above the gear keeping it upright so capillary action will draw it downwards. I am now considering a good spot to drill a 1/4 inch hole and put a Gortex patch over it to try to get rid of fogging.
Jeff Saline cautions: One thing I don’t remembering anyone commenting on is allowing super glue the opportunity to out gas outside of the instrument housing. I haven’t ruined a lens yet but understand that if you use super glue and immediately reassemble the instrument housing the super glue will out gas and fog the instrument housing lens(es). I was repairing a high beam indicator blue lens the other day and have had the instrument out gassing for 6 days now. I recall hearing 24 hours is enough time
Simple Odometer Repair
A slipping or non-working odometer can be quite a nuisance. One cause for it is a small gear in the odometer that is slipping on its shaft pin.
The simple photo procedure contained here will help you:
- Open your speedometer
- Find the slipping gear fault
- Make a fix-at-home repair
For the repair, it’s best to have a well lit table top to work on. Use a clean white cloth under the project so any missed parts are easily seen. Actual work time for this in-house repair should be approximately one hour. Extra time should be allowed for glue to cure before reassembly.
Tools needed:
- Small phillips screwdriver
- Small slotted screwdriver
- Needle-nose pliers
- Super glue, epoxy, or J.B. Weld
I’d recommend using surgical gloves to keep fingerprints off of the insides of the instrument. Read through this simple procedure before any disassembly takes place. Get familiar with what’s ahead for your repair.
Photos are of a 1978 R100/7 instrument cluster.
Photo credit: Randy Mallon
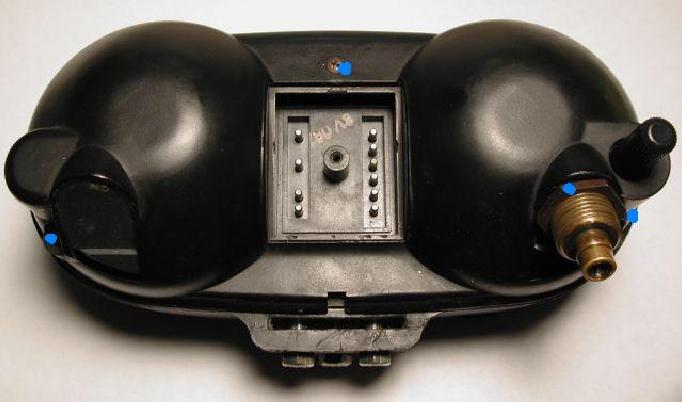
Photo 1. Remove these three screws and speedo cable nut.

Photo 2. Remove these screws.
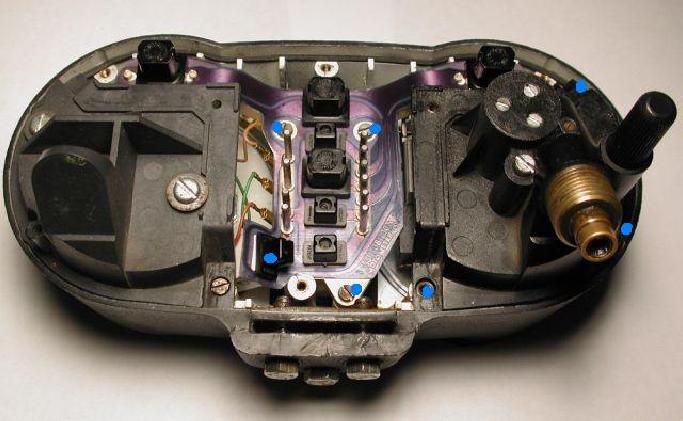
Photo 3. Remove the three screws holding the center electrics in place.
Remove the three screws holding the speedometer in place.
Pull out high beam indicator bulb so the electrics can be moved.
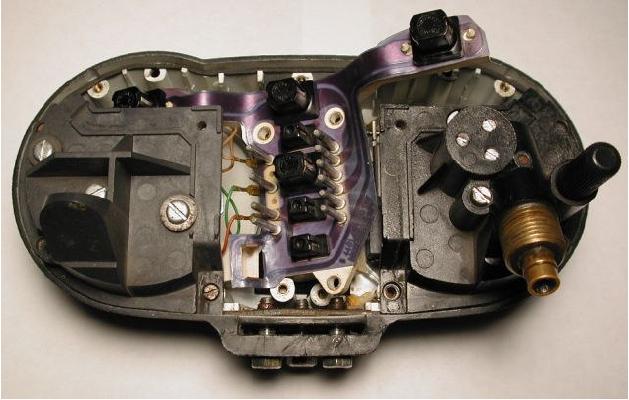
Photo 4. Set electrics to the side as shown.
Carefully lift speedo unit out.
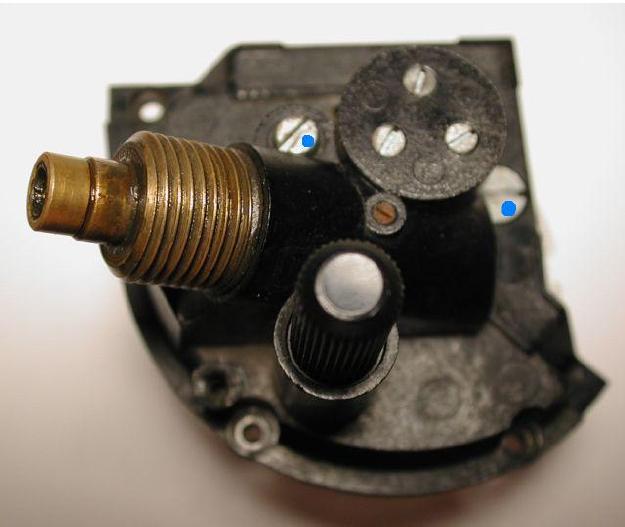
Photo 5. Remove these two screws. Carefully pull up unit and set aside.
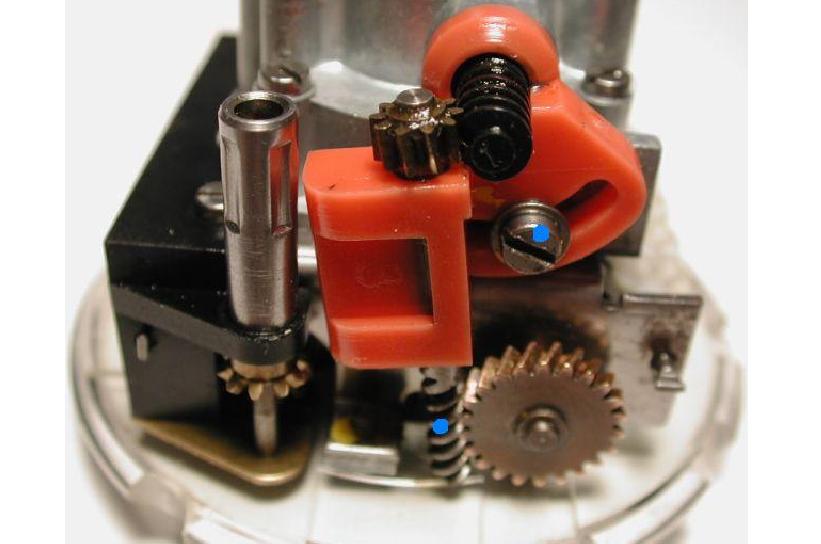
Photo 6. Loosen screw a bit and swivel back worm gear.
NOTE: The brass gear on the right is on the same shaft pin as is the problematic slipping gear.
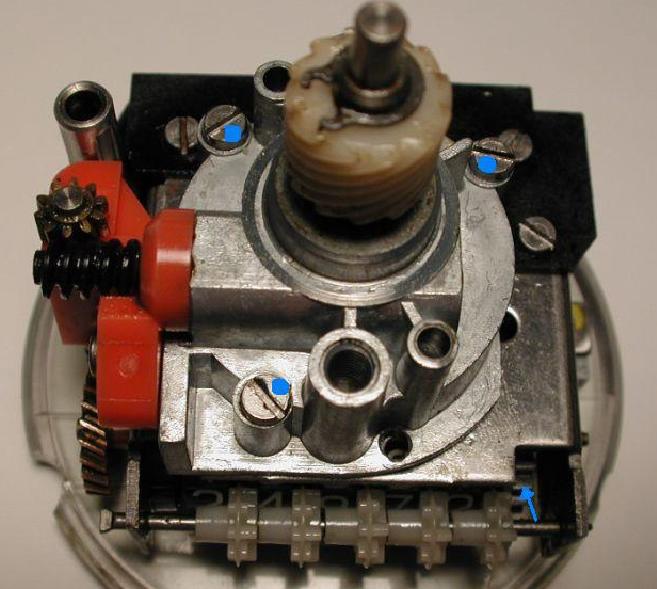
Photo 7. Remove these three screws.
Remove gearing unit and set aside
NOTE: The slipping gear to fix can be seen just to the lower right. See blue arrow. (read Photo 9 note before proceeding)
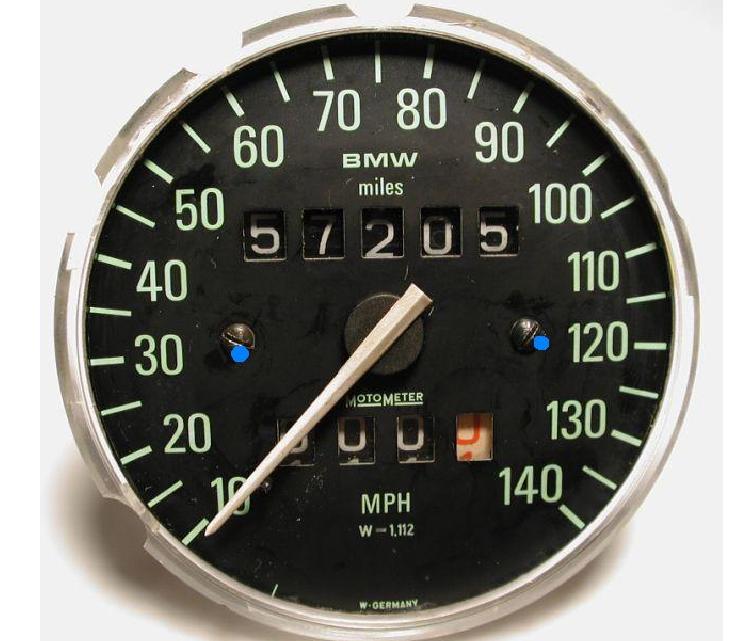
Photo 8. Remove these two screws.
Use needle nose pliers and carefully pull speedometer needle up and off. Remove speedo face plate.
NOTES: Notice the greasy paw prints on the flat black paint? It’s a good idea to use disposable rubber gloves. If need be, use a soft brush and rubbing alcohol to clean oil off face of speedo. Try distilled water too. Pat dry. Rinse, repeat.
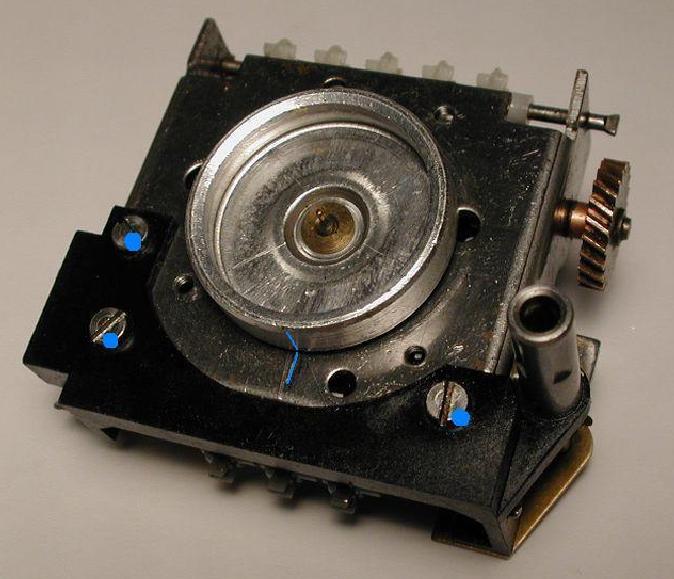
Photo 9. Remove these three screws.
NOTES: Before removing speedometer needle, scratch a mark for proper alignment when reassembling. This will aid in setting speedo needle back in its proper place.
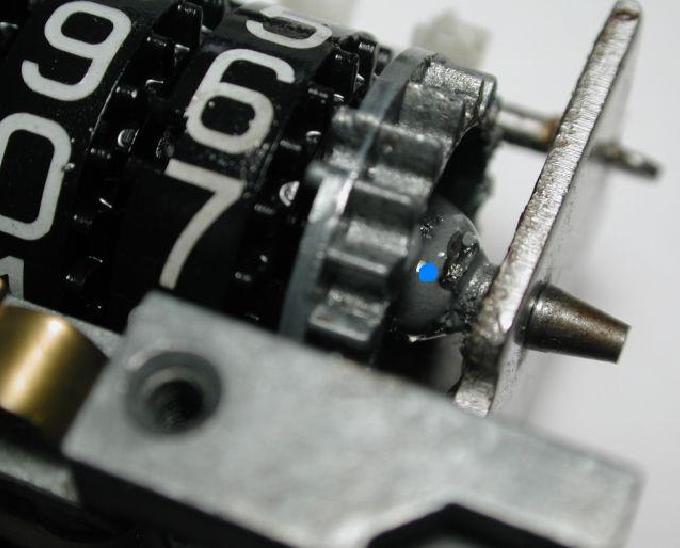
Photo 10. Apply adhesive here.
Use a straight pin or needle, etc. to apply.
NOTES: A quick setting epoxy can work well, or maybe Super Glue, or J.B. Weld as shown. If need be, remove drive pin and thoroughly degrease/clean. Roughen the metal a bit to help glue to adhere. Also, before gluing, be sure gears are in correct alignment and do not bind at all. After the glue completely cures, manually work the odometer to check for smooth operation. If the repair is bad, use a razor blade to cut through cured glue. Remove debris and start over. With the odometer removed, you should do a through cleaning:
- Spray the odometer through out with WD-40 to help remove oil/particulates that could jam gears.
- Rinse under the faucet with warm water for a minute.
- Pour isopropyl alcohol over odometer to degrease and to displace water.
- After drying, use a bit of silicone spray on odometer before reinstalling
- As a precaution, be sure to let glue dry and out-gas over night before reassembly.
- CAREFULL WITH THE GLUE! Think of this simple project as doing brain surgery.
You may or may not have good results the first time. Don’t give up. Try again. I had good luck with epoxy for a few years. I had to make the repair again last spring. JB Weld was used and the odometer hasn’t skipped a mile since then. Super glue can work also. Be very careful around the small gears with the glue.
For reassembly of the instrument cluster, just follow back through the procedure.
Photo 11. Upon reassembly, make sure both bulb socket tangs are in their correct place.
NOTE: You may should take the tach out and thoroughly check the entire instrument cluster housing for any cracks that may need a touch of super glue or epoxy to strengthen. Good to completely clean and brush out any accumulated dust and particles.
When instrument cluster is back on the motorcycle, be sure to test the speedometer. I checked and set mine using a GPS at 60 mph. If you’re not happy with the speedometer reading, you’ll have to open the instrument cluster again and reset the speedometer needle.
Some have rigged up a variable speed drill to their speedometer before it’s installed on the bike. They would run it to 60 mph and watch to see if the odometer would spin a mile a minute. I’ve had good enough results with just making a mark (see Photo 9) before the needle is removed.
Good luck and ride alive!
Randy Mallon
Austin, Texas
1978 R100/7
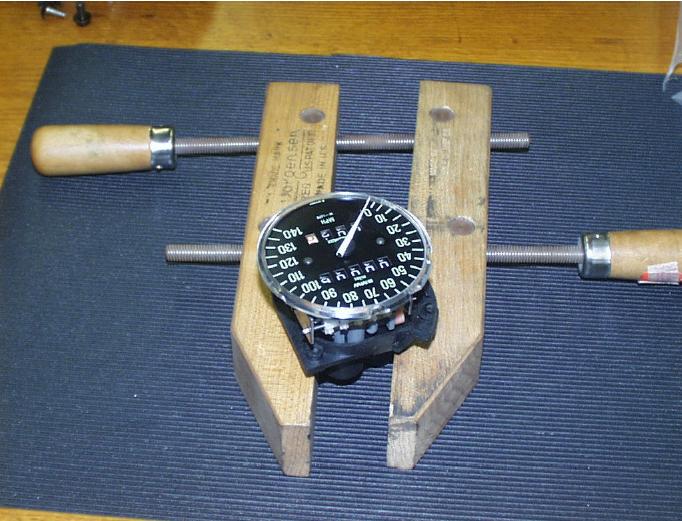
From Jeff Saline: The gear that I always find is slipping is the silver gear next to the single miles number wheel. You can probably take a small screwdriver and gently rotate it on the shaft if it’s loose. I fixed two odometers last week with this problem. I’ve found a Jorgensen woodworkers clamp works great as a holding device (see photo below). I put the base of the instrument between the jaws and gently tighten the jaws until it is just steady. I don’t want to crack the plastic housing or distort anything. This leaves the clamp flat on the work surface and the instrument face pointed towards the ceiling. To remove the needle I gently take two 1/4″ flat bladed screwdrivers and put the tips under the needle and rest them on the two faceplate screws at 3 and 9 o’clock positions. Now, before I pop the needle off the face… : ) I gently move it up and over the zero pin to see where it rests naturally. Usually it’s just on the down side of the pin. This allows me to return it to the same lousy calibration it had before I started surgery. I remove the needle by pushing down on the screwdriver handles which forces the needle up and off the pivot pin.
Make sure you aren’t putting sideways pressure on the pivoting pin or you’ll be buying a new instrument. Then I remove the face plate screws and the faceplate. I try not to touch the face of the speedometer if possible as it shows finger prints, is very hard to clean and many times the painted numbers and calibration marks flake off. Since I know the gear is loose on the shaft I’ll slide the shaft with the shaft drive gear out to the left. The shaft drive gear is the one which is driven by the worm gear on the left.
Before you pull the shaft take a good look at the little white wheels on the shaft just above the odometer numbers that make the odometer numbers move. Pay attention to the orientation of the white wheels, they’ll all be in the same orientation with a “long” leg touching the odometer number wheels. If you get a white wheel off orientation when you reassemble the shaft you’ll end up with a number that’s half off the rest the first time it rotates. It’s easier to pay attention now than to have to try to move the gear on the shaft after it’s been dinged and pressed back on. I decide where the driven gear that’s been slipping is placed on the shaft and then taking a very sharp center punch I put one or two dings in the shaft where the gear mounts.
If it’s only a little loose it gets one ding and if it’s real loose it gets two dings 180 degrees apart. To support the shaft while I ding it I put it in a vise between some soft jaws. I usually have to dress the shaft at the dings so I can get it to slide back into position through the odometer number wheels. Then I use a couple of screwdrivers to take up the slack on the right side of the gear and using a small C-clamp press the drive gear and shaft into the correct position.
I’ll place a small socket on the right side for the C-clamp to touch so the shaft that’s getting pressed into place on the formerly slipping gear has a place to go. Sometimes this takes three or four tries as I don’t want to get the gear too tight or the odometer wheels won’t turn freely and if too loose the odometer wheels could rotate by themselves.
Some folks like to epoxy the gear to the shaft instead of taking it apart. I’ve done that too but it’s a bit of work making sure the shaft and gear are clean and will hold epoxy. When I was doing it that way I was always worried about getting cleaner on the odometer numbers and having them discolor or rub off. Once I get the gear pressed on I’ll put the face plate back on and then gently press the speedo needle on the pivoting pin. I have to get the orientation correct before touching the needle to the pivoting pin.
After the needle touches the pin you won’t know if the pins rotated or not. Then I’ll lift the needle over the pin at zero mph so it’s on the correct side and test the instrument. To test it I put an old speedo drive cable in my lathe three jaw chuck. I’ll reserve direction of the lathe so the cable will be spinning in the correct direction. I usually test just the cable to make sure everything’s spinning freely before I hook up the speedo.
Then, with the speedo hooked up I’ll turn on the lathe and gently spin it up and down a few times. After I’m sure it’s working correctly I’ll hold the lathe speed at a constant and watch the needle for jumping. Last week I had my RT speedo at 135 mph and it was so smooth and steady I thought it was stuck.: )
The lathe was at about 3,000 rpm when the speedo was at 135 indicated. I’ll also watch the odometer the entire time to make sure it’s working correctly. I use white lightning grease to lube the speedo gears and I’m now trying a drop of 3 in 1 oil for the drive bushings and shaft. Good luck with your repair.
Jeff Saline
ABC #4412 South Dakota Airmarshal
Photo credit Jeff Saline
From Paul Glaves: The problem is usually caused by too much end play on the number wheels of either the trip meter or the odometer. If the trip meter stops turning it is its drive gear slipping and the end play problem is with its number wheels. If they both stop turning it is slipping of the main drive gear which is driven by the little spiral gear. The jammed number wheels could be on either the odometer of the trip meter so check carefully.
You can detect the excess end play by wiggling the number wheels sideways with a small pick. They should move very little. To take the end play out you need to turn the head on its side and support the shaft on something solid. Then put a small socket or hollow driver against the gear (shaft in the socket hole) on the opposite end of that shaft and tap lightly to drive the gear a little further onto the shaft. This takes up the end play in the number wheels which eliminates the jamming. For good measure put a drop of super glue – the thin kind, not the thicker gell type at the joint between the shaft and the gear.
I’ve done this to several of the units and it has always solved the problem. This assumes that the speedo is operating correctly and that the odometer has jammed.
