

Hi All,
First post here. I am performing a complete cosmetic and mechanical restoration of an 1976 R75/6 and have hit a snag. I am completely disassembling the bike to measure up all the engine components and have not been able to get the camshaft out of the engine. I want to remove camshaft and crankshaft to measure everything up. There is very little mention of how to accomplish removal of the camshaft in any of the references I have and I have not been able to find much online either. I have the complete set of engine bearing and sprocket pulling tools from CycleWorks but it doesn't appear to include any kind of puller for the camshaft sprocket. I used this set of tools to pull the crankshaft nose bearing and sprocket and they worked beautifully. For the camshaft, one of my references says something like "use an appropriate gear puller" so I have been trying to remove the camshaft sprocket with a 2-jaw puller and protecting the points cam with a socket. No luck pulling the sprocket off yet despite lots of heating, penetrating oil etc. Seems really stuck on there. I am thinking a three-jaw puller would be better. Also tried to loosen the bolts holding the camshaft bearing in the front of the crankcase but cannot turn them with the camshaft sprocket and tach drive gear blocking access. There doesn't appear to be any way to get at them with a socket as eccentric drive gear for tach is in the way. Bolts are slot head 10 mm which doesn't give much leverage with a screwdriver and they won't turn despite heat and penetrating oil. So cannot pull camshaft out with the bearing either. Oil pump is disassembled with woodruff key out. Any advice greatly appreciated!!
Tobin
Thanks! I have seen this excellent article and I referred to it when I was removing the crankshaft sprocket and nose bearing. He doesn't deal with camshaft removal though. I guess some of you are probably wondering "why does he need to pull the cam"? Good question. I probably don't. Part of it is wanting to learn about these bikes (this is my first BMW restoration after several British and Guzzi restorations) and part of it is peace of mind knowing that everything in and on the bike is in spec. I don't make any assumptions with old bikes any more. The bike has 76K miles and I have not detected any wear on major engine components so far. I previously did a top-end restoration involving new rings and cleaned up valves and seats etc. but the rest of bike has been perfect. I anticipate cams and crank journals to be right in spec but want to know for sure.
. . . I guess some of you are probably wondering "why does he need to pull the cam"? Good question. I probably don't.
If you want to replace the cam sprocket, it is my opinion that you DO need to remove the camshaft. When I did that job on my 1974 R90/6, I was told that I could pull the old sprocket, then heat the new one and it would grow enough to slide onto the camshaft with the shaft still in the engine. I found that not to be the case. I wrote a detailed build story on the advrider.com forum that explains why (among lots of other things).
For what you are wanting to do, you could drop into my build thread about right here. Scroll down a few pictures and you will see the 3-jaw puller setup that I bought from Dan at Cycle Works. I don't think he is listing that anymore, which is too bad for you. It works great. You could probably come up with a substitute by looking at my pictures.
Also, those two bolts you are trying to remove were tapered socket head machine screws on mine. If you drop into my build thread HERE, you can see that I had a bit of a struggle also, but found a way to do it. Scroll down just a bit to see the setup I used to reinstall them with a torque wrench, with the new sprocket installed onto the camshaft. There is room to access them adjacent to the tach drive gear.
Good luck with your bike.
Ray
. . . I guess some of you are probably wondering "why does he need to pull the cam"? Good question. I probably don't.
If you want to replace the cam sprocket, it is my opinion that you DO need to remove the camshaft. When I did that job on my 1974 R90/6, I was told that I could pull the old sprocket, then heat the new one and it would grow enough to slide onto the camshaft with the shaft still in the engine. I found that not to be the case. I wrote a detailed build story on the advrider.com forum that explains why (among lots of other things).
For what you are wanting to do, you could drop into my build thread about right here. Scroll down a few pictures and you will see the 3-jaw puller setup that I bought from Dan at Cycle Works. I don't think he is listing that anymore, which is too bad for you. It works great. You could probably come up with a substitute by looking at my pictures.
Will try to get myself an equivalent 3-arm puller somewhere. Any brand and/or number markings on the one you have? I assume it is readily available elsewhere
Also, those two bolts you are trying to remove were tapered socket head machine screws on mine. If you drop into my build thread HERE, you can see that I had a bit of a struggle also, but found a way to do it. Scroll down just a bit to see the setup I used to reinstall them with a torque wrench, with the new sprocket installed onto the camshaft. There is room to access them adjacent to the tach drive gear.On my bike they are combination 10 mm hex-head and slot-head bolts (M6?) which I find really weird. Makes no sense to me. Socket-head is a much better idea. I assume mine are factory stock, and if so, very strange! Basically impossible to turn them with a screwdriver and I have already buggered up the slots. Will see if I can access with a socket as you describe. If I can't do it, sprocket will have to come off before I can deal with them
Good luck with your bike.Thanks! Appreciate the help!
Ray
The puller: I found my receipt from Cycleworks that showed the purchase of that puller. It was dated 2/19/2015. The puller set was not real expensive. It cost US $35.00 for a three piece set. The three pieces are (1) the puller itself (2) a sleeve to protect the points cam spindle on the nose of the main camshaft, and (3) a grade-8 bolt to thread into the end of the sleeve. My notes show that I called Dan on the phone prior to ordering this and some other tools. I had asked if the protective sleeve was available separately, which it was, for US $15.00 at that time. What made the puller special was only that the pads at the end of the three jaws had been ground off sufficiently to fit between the back of the cam pulley and the front face of the crankcase.
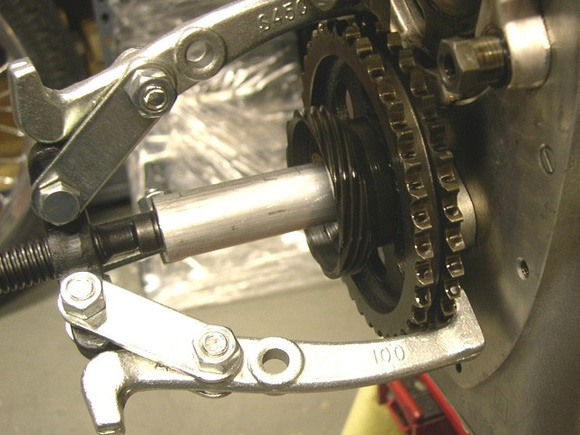
The sleeve was turned from aluminum bar stock, but I suppose a suitable socket could be used if you are very careful. The bolt was sized such that it would fit the threads in the nose of the crankshaft. It is used in both places to provide a good bearing surface for the end of the puller bolt, protecting the nose of the crankshaft and the nose of the points spindle. You mentioned that you had the puller kit for up top, so you probably already have the bolt as part of that kit.

I have similar pullers from Harbor Freight, so that is a probable source -- for just the 3-jaw puller, that is.
I understand that when Dan at Cycleworks is out of stock on an item, he will take it down from his website catalog until he can replenish the stock. He has had issues lately, with customers publicly complaining. Despite that, you may want to call him and ask about this kit. I have bought a number of items from him, and the quality and function-ability were always first-rate. I had to wait for them a few times.
Your bolts: BMW made an engineering change in September, 1975, to replace the countersunk head machine screws (costing 52 cents each) with a pair of hex bolts, part #11 31 1337107 (costing $8.97 each). This is the reason for the difference from my 1974 R90/6 and your 1976 R75/6. If you pull the sprocket, you obviously would have wrench access. The problem as I see it is, you need wrench access with the new sprocket pressed onto the camshaft.
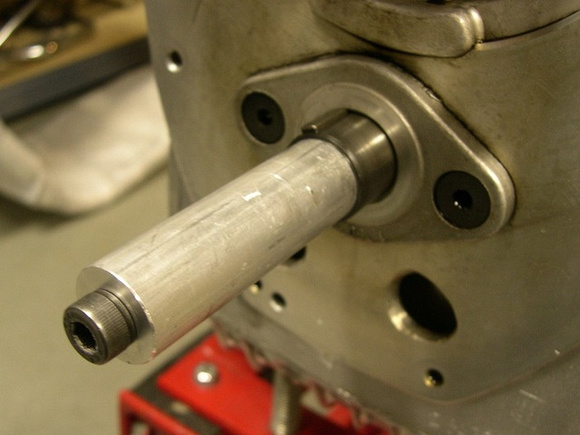
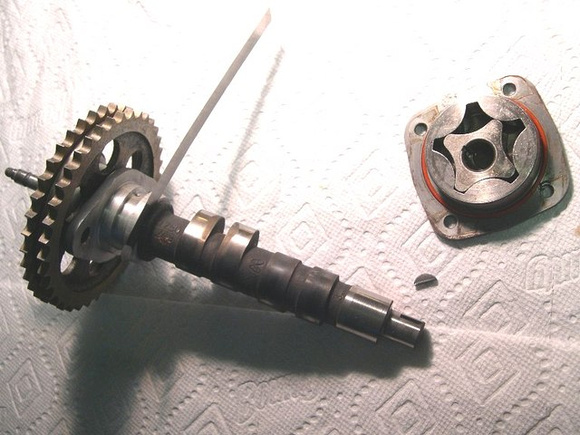
Here's the issue -- with the camshaft in place in the crankcase, but without the pulley, I found it has .046" fore/aft play. The normal end play is established by how far the pulley is pressed onto the camshaft. Try to put the pulley on, and the cam slides back toward the rear of the engine. You need some way to hold the camshaft forward while installing the new pulley and establishing the proper end play of .004". Don't let anyone tell you that with enough heat, the pulley will grow to where it slides into place with your fingers. I tried several times, with successively higher temperatures. I tried various ways to hold the cam forward (I had the pan off the bottom of the engine, and the engine was out of the frame). I wound up installing the new pulley while the camshaft was out of the block:
I used these special tools, in lieu of a press, but either would work:
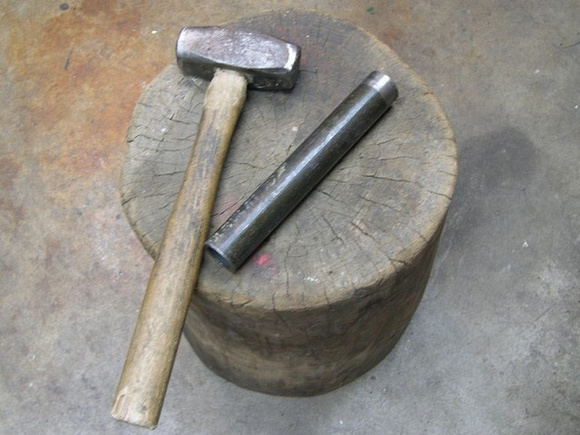
You won't be able to do it that way unless you can find a way to install and torque those front bolts that BMW updated for you. :unsure:
I think the dealer method involves supporting the crankcase (with camshaft installed) such that the oil pump end of the camshaft is on a block in a hydraulic press, and the heated pulley is pressed on the front end of the cam using the ram of the press. This is the way the idiots who wrote the Clymer Manual describe doing it. Seems awkward to me. Good luck!
If you figure it out, let me know. I now have a '76 R90/6 in addition to my '74 model, so I guess I'm in the same boat you are.
Ray
Got it!! A week of soaking in penetrating oil and some more heat did the trick without any drama even with the 2-arm puller. Got the two bolts holding the cam bearing with a handheld impact wrench. Now am working on extracting the front crank bearing to extract the crankshaft. Got the proper puller for that but no luck so far. Looks like heating the entire crankcase in an oven or BBQ might be required to extract that. Thanks for all the help.
Tobin
Front crankshaft bearing out! Crankshaft out! A day of soaking in PB Blaster and some more heat did the trick. Those CycleWorks tools are slick. Engine is completely disassembled now so time to measure everything up. All bearing surfaces look good so anticipating not being able to measure any wear.
Advertisement


