Open post

$4 Carburetor Synchronizer

Since joining the Airheads shortly after purchasing my first-ever Beemer in October of 2001, I’ve found the AirList to be an invaluable source of information and direct feedback as I learn my way around my new 1984 R100RS. One of the first things I do when acquainting myself with a new mount is a basic tune-up. Lurking on the Airlist provided a bunch of helpful tips to supplement (and correct) the tune-up info in the Haynes and Clymer manuals.

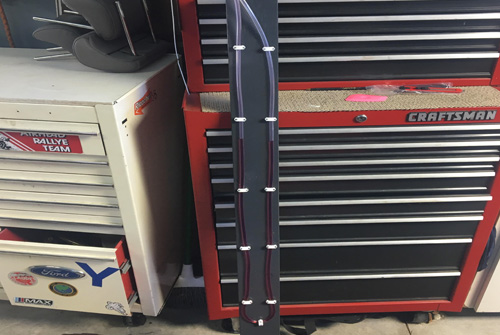
One of the slickest tune-up tips I came across was Tom Rowe’s mention of a ridiculously cheap and easy-to-build differential manometer (vacuum gauge) for balancing carburetors on vacuum port equipped Boxers. I’d read about the Twin-Max (aprx. $80) and have used the $40 CarbStix on my 4-cylinder Hondas, but for less than $4, I was able to build a twin carb synchronizer that is 16 times more sensitive than my mercury vacuum gauges and can be assembled from common materials available at almost any hardware store. I built it and my R100RS loved it – it really smoothed out some bands of footpeg/bar/mirror vibration that the bike had, even after using the CarbStix.

I posted a ‘Thank You’ note for the idea on the AirList after I tried it and got even more valuable feedback from Jay Carpenter and a request from John “Beetle” Mailleue, ABC# 5657 to write a tech article for the AirMail. After spending some more time in the garage incorporating Jay Carpenter’s ideas, I figured I’d go ahead and write-up a description of how to build and use the $4 Carb Synchronizer, because it REALLY works. Super cheap, super accurate, super easy to build and super easy to use – CLASSIC Airhead technology!

Credit for the original idea has to go to Marty Ignazito of the powered-parachute crowd, he came up with the idea to balance the twin Bings on a two-stroke Rotax and his original write-up is at www.powerchutes.com/manometer.asp. If you try this idea and like it, send Marty a thank-you e-mail at mdipe@mcleodusa.net.

Here’s the Materials List for the $4 Carb Synchronizer Tool:

20 feet of clear plastic (vinyl) tubing – inside diameter big enough to slip on the vacuum nipple of your carb (3/16″ i.d. worked for my bike, but it’s tight, maybe 1/4″ i.d. might be better). 15 cents per foot in the plumbing section at my local ‘big box’ hardware store, Sutherlands.
A yard stick – Home Depot sells an aluminum yardstick for under $2, but you can make a perfectly satisfactory gauge with a 3-foot piece of 1″ wooden lathe for next-to-nothing. (For a ‘professional’-looking gauge, I actually used a yellow aluminum 4-foot rule, but that was wretched excess at $5.)
3M/Scotch/Whatever – clear mailing/packaging tape. You should have some of this left over from the Christmas mailing season; otherwise around a $1 a small roll (and you won’t need much).
2 short nylon zip-ties – You should have these in your garage. If not, buy them in bulk for cheap in the wiring section of Home Depot, Sutherlands, Ace Hardware, etc. – you’ll use them and wonder why you didn’t have them before.
A tiny amount of automatic transmission fluid – Actually, just about any fluid works, including used motor oil, colored water, 2-stroke oil, etc. I chose ATF because I already had a gallon of it and (most important) it is really thin and is RED (which looks WAY cool as the indicator fluid against my fancy yellow ruler) and ATF won’t hurt the engine if it accidentally gets sucked in the carb’s vacuum port.   (ed. note: 90W Tranny fluid works well and because it’s thicker – it’s less likely to get sucked into the carb.)

Building the Balancer

Fold your 20′ of vinyl tubing in half and mark the center point. Lay your yardstick down flat on a convenient work surface (kitchen table or floor). Place the center point of the tubing at the bottom end of your yardstick (there is generally a hole at the top end of the yardstick – put the center-bend of your vinyl tubing at the opposite end of the yardstick from that hole). Carefully run the tubing up each side of the yardstick, making sure that the tubing makes a smooth, non-kinked bend at the bottom.

Use the clear packing/mailing tape to fasten the tubing in place on either side ( left and right ) of the yardstick. Thread the zip-ties through the hole at the top of the yardstick and snug the left and right side tubing to the respective sides of the ‘stick with the zip-ties. You should now be able to hang your yardstick from the hole in the top ( I use a bungee suspended from a hook in the garage ceiling). The tubing runs around the perimeter of the yardstick and about seven feet of tubing hangs down from the left and right sides of the ‘stick. I fold a piece of tape around each end of the tubing like a little flag and mark the left side with an “L” and the right side with an “R” using a magic marker.

Now, put one side of the tubing in the container of automatic transmission fluid and, using the other side of the tubing like a drinking straw, suck ATF fluid about three feet up into the tubing. Maintaining suction for a second, pull the tubing out of the ATF container and then raise BOTH ends of the tubing above the top of the yard stick. Temporarily fasten both ends of the tubing high enough that the ATF drains down to the loop at the bottom of the yardstick. I recommend leaving it overnight so that all the bubbles, etc. work their way out.

You must be a member to view complete articles on this website. If you are already a member, you can log in here. If you aren’t a member yet, you can purchase a membership here.

Continue readingMore Tag

The Dell’Orto Carburetor

If you can stomach all this reading and absorb and understand it all …you could become a DellOrto expert!

Be sure to see the information on the floats, it does pertain to Airheads, this is in section 3.2.2. See also near the very end of the long article below that you are reading, where there is my information on the pump setting and float setting, as pertains to BMW Airheads specifically! There are hints there too!

The following information article came from, I was told, the .startwin.com site, and was sent to me in a zip file, which I have unzipped, modified, and put below. I have been unable to find the author or person who might, or might not, have copyrighted this information, so as to gain official permission to place it here. This article, whatever its original source, now appears to be public property. I tried to make sure about that, so, on 10-06-2003, I sent e-mails to van Star Twin Motors, the Startwin.com folks, asking about use and copyright. There has never been a reply. I last viewed their website in November 2017, and there is nothing about the carburetors.

I have added my own comments to the article prefixed by ***, and underlined. I have corrected many typographical errors and misspellings in the original article …and changed to U.S. type English spelling and usage. I have also eliminated some in-article hyperlinking, etc. There are places that my comments now are not all that clearly identified, as I wished to eliminate red color I used in earlier versions of this article, which resulted in gaudiness and an unprofessional look to the article; so this latest version generally uses asterisks and underlines for personal comments by me as well as for normal emphasis. I have also modified how the original’s photos are formatted and placed, and added borders, and I also prevented wrapping of text around the photos.

The following informational article can be quite useful for those trying to understand how any carburetor works. While the information does not deal directly with Constant Velocity carburetors, it does deal with needle & slide carburetors, & a vast percentage of the information applies to all types.

You must be a member to view complete articles on this website. If you are already a member, you can log in here. If you aren’t a member yet, you can purchase a membership here.

Continue readingMore Tag

Carburetors

Some time ago a very embarrassed Airhead owner contacted me about how to ‘fix’ his carburetors. He has Bing CV carbs, and replaced the diaphragms, floats, etc. himself. Frankly, he is a bit ham-fisted. He also hates to ask for advice. He proceeded to nearly destroy his carburetors. The many e-mails with him prompted this article. There is a LOT of information in this article, and lots more on the author’s website. Carburetor work is not very difficult, easy to learn, and once you have worked on your carburetors, perhaps at such at an Airhead TechDay, you will wonder what all the fuss was about and you will find that it is easy the second time, and you might hardly need to refer to this article …or one of my others on carburetors…again.

I have my own ideas about when one should consider working on your Bing CV carburetors (and fuel tank and petcocks!):

YEARLY: depending on mileage and use: clean/dump float bowl contents, check corner bowl jet to be sure it is clear/open, possibly replace float bowl gasket if poor; empty gas tank, remove petcock(s), clean tank, dry it, clean petcock screen(s), possibly service petcocks internally if they are getting quite stiff to turn; or, if leaking.   Inspect fuel hoses. I consider these things part of carburetor servicing.  Failure to service the fuel tank will eventually be costly.

5,000 mile intervals: synchronize the carburetors, but ONLY AFTER the valve adjustment and ignition timing adjustments are checked FIRST.

30,000 mile intervals: replace float assembly (if original one piece assembly).  Always also replace the float needle and clean out the central jet assembly.  Replacing the float assembly is UNlikely if you have the alcohol-proof separate floats that Bing now offers.  However, if you have those, be sure to replace the float needle and 

{mprestriction ids=”4,5,6,8,9,10,11,12″} check the adjustment of the flimsy brass floats bridge, info on the Snowbum website in its own article on these independent float kits:
http://bmwmotorcycletech.info/bingindependent.htm

You must be a member to view complete articles on this website. If you are already a member, you can log in here. If you aren’t a member yet, you can purchase a membership here.

Continue readingMore Tag

Early R75/5 Bing CV Carburetors

This article deals with problems with early versions of CV carburetors used on the R75/5. This includes getting the bike to start and to idle correctly as best possible.

A basic mini-overhaul can be done with the carburetors in place on the engine. This may be enough. Three articles, the one you are reading, and http://bmwmotorcycletech.info/bingcv.htm  ….and http://bmwmotorcycletech.info/bingcv-2.htm are not just about how to overhaul Bing CV carburetors. These articles are specifically designed to fully inform you what you need to know, as an Airhead owner/rider, about Bing CV carburetors.

While it may appear that the information in the below article does not apply to the later carburetors (except for information as to how the /9 & /10 and later carburetors are different from these /1, /2, /3 and /4), that is not so! The information in this article should be read by anyone that also works on later model CV carbs …as some things are good to know ….such as about the springs that might be added, changes in parts, and problem area.

Before working on the R75/5 carburetors to cure what might seem to be carburetor problems, such as high or irregular idle rpm or inability to properly adjust the carburetors, it is important that the engine valves be set correctly, & the ignition timing be correct. Be sure there are no vacuum leaks at the throttle shafts.  Be sure the hoses between carburetor & cylinder head are tight & not leaking vacuum (spray with any volatile solvent …must not be idle rpm changes). Never work on carburetors unless you are sure all else is OK!

You must be a member to view complete articles on this website. If you are already a member, you can log in here. If you aren’t a member yet, you can purchase a membership here.

Continue readingMore Tag

Bing CV Carburetors – Part 2

A basic MINI-overhaul can be done with the carburetors in place on the engine. This is often quite enough. Two articles, the one you are reading, AND http://bmwmotorcycletech.info/bingcv.htm are not just about how to overhaul a Bing CV carburetor. These two articles are specifically designed to fully inform you what you need to know, as an Airhead owner/rider, about these carburetors.

The one exception is if you have an R75/5, which came with a particularly troublesome version of the Bing CV carburetor. For those R75/5 carburetors, you should review the above linked articles; AND, in particular, review  http://bmwmotorcycletech.info/earlybingR75CV.htm

1. Starting problems:

It was in November of 1971 that BMW first …and almost lastly….recommended OPENING the throttle during cold or very cold starts. We all know that this can be a necessity depending on the bike, temperature (does NOT have to be very cold), & how the carburetors are adjusted. That is still true for later models, but BMW has dropped the recommendation of an opening throttle. SHAME.   While SOME Airheads will start OK with throttle shut off and enrichener turned on or fully on, many need a bit of throttle playing AS THE ENGINE BEGINS TO START.

If your Airhead starts OK, enrichener (choke) in use, ….then seems to run out of fuel, after perhaps 15-30 seconds:  
Inspect for a partially clogged jet at the bottom of the corner of the bowl well.  If OK, check the  bowl gasket and also the enrichener gasket/screws problem.  The gasket may get sucked inwards a bit, check all 4 sides; check the 4 screws too, they tend to loosen.  There is also the possibility of a wrongly assembled enrichener. If the bowl corner jets is clogged badly enough, bike might not start at all. Both situations are often much worse on cold days. Check the tube for cracks…this tube leads downwards from the carburetor body into the bowl well. Very early Bing CV carburetors have pressed-in float bowl enrichener jets, not screwed-in. THE enrichener jet in the float bowl MUST BE CLEAR, NOT CLOGGED!   Check all these items for BOTH carburetors.

WHY does the float bowl gasket make a difference in starting?  Because sealing of the float bowl is involved in how the enrichener in the body of the carburetor is able to lift the fuel from the float bowl well.

Check if you might have installed the enrichener parts backwards, or mixed-up left and right parts. NOTE that the punch prick mark on the enrichener shafts have been seen Bing-factory-installed 180° off! That is, the punch prick marks are WRONGLY DONE for the shafts of the enrichener as installed by Bing. See http://bmwmotorcycletech.info/bingcv.htm; or Part 1 of my two Bing articles on this airheads.org website.

You must be a member to view complete articles on this website. If you are already a member, you can log in here. If you aren’t a member yet, you can purchase a membership here.

Continue readingMore Tag

Bing CV Carburetors – Part 1

For a well-done overhaul article…step by step…with 44 pictures….see BMWMOA magazine, BMW-ON (BMW Owners News), March 2003, for an article in great depth by Gary L. Smith. You can probably get that back issue at http://www.bmwmoa.org. From that main page, click on left side for Country Store, and then on the Country Store page, go to Back Issues.

I have SOME nitpicking on that article:
1. See my notes in the article you are reading.
2. Use faint amount of silicone grease on all O-rings & on enrichener parts (do NOT overdo this, you do NOT want to plug jet holes).
3. If doing a complete overhaul, which involves removing the butterfly to replace the throttle shaft O-ring (be sure to silicone grease that one & be SURE to MARK the butterfly for correct refitting: something like TOP, OUTER; or TOP, facing REAR…or something of that sort….BEFORE you remove the old one. HOPE that the previous workman did not install yours backwards, because it can be fun to figure out unless you know what it is supposed to look like. In the article you are now reading I have photos of what it IS supposed to look like….. & NOT look like.
4. The article you are reading, below, has considerably more complete information about orienting the enrichener parts.

A basic MINI-overhaul can be done with the carburetors in place on the engine. This is often quite enough. Two articles, the one you are reading….and http://bmwmotorcycletech.info/bingcv-2.htm (which is article 3B) are not just about how to overhaul a Bing CV carburetor. These two articles are specifically designed to fully inform you what you need to know, as an Airhead owner/rider, about these carburetors. The one exception is if you have an R75/5, which, if stock, has a particularly troublesome version of the Bing CV carburetor, as it was the first generation of these carburetors. For these carburetors, you should review both of these above two linked articles AND, in particular, review myarticle #6:   http://bmwmotorcycletech.info/earlybingR75CV.htm

You must be a member to view complete articles on this website. If you are already a member, you can log in here. If you aren’t a member yet, you can purchase a membership here.

Continue readingMore Tag

Bing Carburetor Floats and Float Needles

Bing carburetors FLOAT NEEDLES, whether the pure slide type carburetor, or the CV type carburetor, both as used on BMW Airhead motorcycles, come in several varieties. In general, TWO present-day available versions will fit all the Airheads carburetors. Very early carburetors had a solid metal needle. That needle was available in more than one ‘style’, but for all, there was NO rubber tip nor a Viton tip, tip was simply part of the float needle. The later type of needle, that most of Airhead owners have, is similar to the photograph below. The needle shown in this photograph has a spring loaded plunger with a hole in it, with the easy-to-lose wire clip, and RED tip material. GRAY-BLACK tipped material will also be seen. I suggest purchasing the stock type needles from your BMW parts supplier, and not Bing themselves.

The all-metal needle used on early models is a different size, and will not properly fit later carburetors, and, vice-versa. Be sure to get the correct needle. If you want to install a Viton-tipped needle in a carburetor that used the Bing all-metal needle, you can, per Bud Provin (TheNickwackettGarage.com), who says to use the very common float needle used on many old Amal carburetors, as used on old British bikes. The part can be found on a simple internet search, for float needle 622/197; or, as 013, 622/197.

You must be a member to view complete articles on this website. If you are already a member, you can log in here. If you aren’t a member yet, you can purchase a membership here.

Continue readingMore Tag
Scroll to top