

Hi All, just purchased my first Airhead. See pics below. Is there any way I can salvage this crankshaft? What if I file it down with a wire brush to smooth it out? Or do I 100% need to replace the crankshaft?
The alternator rotor and stator seized up resulting in the crankshaft tip stripping metal, as the alternator rotor would not turn...so it was the crankshaft tip churning against a rotor that would not move. Stripping metal off the crankshaft tip and the inside of the rotor.
I am definitely replacing the alternator.
Any way I can save the crankshaft? Does it have to be 100% smooth or EXACT original diameter? I'm hoping to be able to save it and just install the new alternator.
Crankshaft:

Alternator:

Well, I've never seen that before.
If this were one of my bikes, I would try avoiding a crank replacement. The wire brush will not do much for you. I once saved a front wheel spindle on a '64 Chevy that was badly gnarled from a spun wheel bearing. I used a fine file to knock down the ridges and long strips of emery cloth to kind of polish out the surface as best I could. I can send you a dead rotor to use for the purpose trial fitting. You may contact me by e-mail; woodnsteel1@gmail.com If you are unable to restore the taper fit without any run out in the rotation of the rotor, you are doomed. I would put the chances of success at 50/50.
former Airmarshal, IL.

Look at it this way... the taper does 3 jobs: mounting, alignment and power transmission. The rotor center bolt also assists in the "mounting". Although the alternator does require power to turn, it's not like this taper was transferring engine power to the rear wheel. So the bottom line is that if you can get the shaft smooth enough and straight enough to do proper alignment, then you stand a good chance of putting this bike back on the road with this crank. So if you work carefully, I think you have an 80% chance of success.
However, the alternator rotor is shot, and you should get a (good used) replacement. You cannot repair BOTH taper surfaces and have this work. So the focus of your actions should be: repair the crank (the expensive part) and replace the rotor (the lower cost part).
Proceed by buying a new, Nicholson flat file, 6-8" x 3/4-1" wide, with a fine tooth pattern, and some 400 grit emery cloth or carborundum paper. The object is to only take the high spots off the crank. Forget about the low spots. If you try to remove every blemish, you WILL be replacing the crank.
For the best fix, you want to turn the taper between centers, as if on a metal lathe. The easiest way to do this is simply start the engine. Sounds mad, but it will work. Engine running (~2000 RPM), lay the file on the taper and move the file forward, with a concerted effort to keep the file FLAT against the taper. The high spots will disappear. While still spinning, wrap the file in emery cloth (to keep it flat) and repeat. Stop when the high spots are gone. Lap the replacement rotor onto the shaft with toothpaste or other SUPER FINE lapping compound if needed. Lastly, thoroughly wash all the grit from the compartment with hot soapy water, as in a trip to the car wash.
Install the center bolt to proper torque with blue LocTite 242 on its threads. Considering that a loose mounting bolt is the root cause of this whole mess, keeping that bolt tight without over-torquing is VERY important. Then you can lay an indicator on the rotor and see what the new runout is. I would not expect zero, but under .003" is probably workable.
Good luck.
Owning an old Airhead is easy.
Keeping an old Airhead running great is the true test.
Look at it this way... the taper does 3 jobs: mounting, alignment and power transmission. The rotor center bolt also assists in the "mounting". Although the alternator does require power to turn, it's not like this taper was transferring engine power to the rear wheel. So the bottom line is that if you can get the shaft smooth enough and straight enough to do proper alignment, then you stand a good chance of putting this bike back on the road with this crank. So if you work carefully, I think you have an 80% chance of success.
However, the alternator rotor is shot, and you should get a (good used) replacement. You cannot repair BOTH taper surfaces and have this work. So the focus of your actions should be: repair the crank (the expensive part) and replace the rotor (the lower cost part).
Proceed by buying a new, Nicholson flat file, 6-8" x 3/4-1" wide, with a fine tooth pattern, and some 400 grit emery cloth or carborundum paper. The object is to only take the high spots off the crank. Forget about the low spots. If you try to remove every blemish, you WILL be replacing the crank.
For the best fix, you want to turn the taper between centers, as if on a metal lathe. The easiest way to do this is simply start the engine. Sounds mad, but it will work. Engine running (~2000 RPM), lay the file on the taper and move the file forward, with a concerted effort to keep the file FLAT against the taper. The high spots will disappear. While still spinning, wrap the file in emery cloth (to keep it flat) and repeat. Stop when the high spots are gone. Lap the replacement rotor onto the shaft with toothpaste or other SUPER FINE lapping compound if needed. Lastly, thoroughly wash all the grit from the compartment with hot soapy water, as in a trip to the car wash.
Install the center bolt to proper torque with blue LocTite 242 on its threads. Considering that a loose mounting bolt is the root cause of this whole mess, keeping that bolt tight without over-torquing is VERY important. Then you can lay an indicator on the rotor and see what the new runout is. I would not expect zero, but under .003" is probably workable.
Good luck.
Thank you, very helpful.....Would you mind clarifying your comment here? I dont really understand.... "Then you can lay an indicator on the rotor and see what the new runout is."
Lastly, what is the purpose of doing this? "Lap the replacement rotor onto the shaft with toothpaste or other SUPER FINE lapping compound if needed."
Sorry first Airhead and just learning. Thank you!
Joe
Thank you, very helpful.....Would you mind clarifying your comment here? I dont really understand.... "Then you can lay an indicator on the rotor and see what the new runout is."
Joe, no problem.
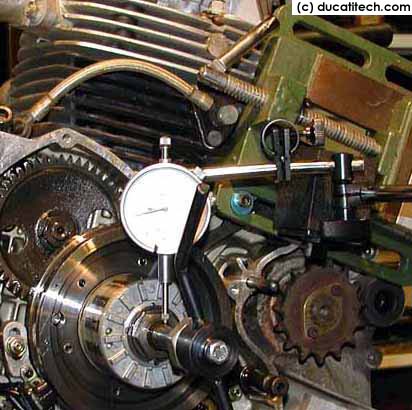
"Runout" is the term used to describe the physical "off-centerness" of an object that turns about a central axis. The crankshaft is held very tightly and rotates about such a center. Everything attached to the crankshaft does likewise. You've probably experienced how badly a car tire shakes when its only 1 oz out. And it's only spinning about 1600 RPM. Can you imagine how badly an alternator would shake if it was 3oz out at 5000 RPM? The forces created would be immense !! The rotor would literally tear itself to pieces and violently fly apart as if a bomb went off. Now, we don't have the means to dynamically balance the rotor, but we can do the next best thing. We can place a dial indicator on the rotor, spin the crank shaft slowly by hand, and take a physical measurement of how true it spins on the crankshaft. (Here we assume that a round part usually has its weight equally distributed.) That act is called "measuring the runout".
Here's a photo of runout being measured on a Ducati alternator...
Lastly, what is the purpose of doing this? "Lap the replacement rotor onto the shaft with toothpaste or other SUPER FINE lapping compound if needed."
Your alternator rotor is held in place by the taper. Two parts with equal tapers will naturally join themselves together in such a way as to become one. The bond is so tight, and the mating so "true" that it's the mating method of choice for high speed machine tools, and has been for well over a century. Mates of absolutely ZERO runout are routinely obtained. The bond is tight because the 2 metals literally intimately join at the microscopic level.
Now, here's the trick. You cannot "enhance" this mate by adding LocTite or some other substance. The only way is to get more metal into contact between the 2 parts. And this is achieved by "lapping". Basically a polishing method where the 2 mating parts polish each other into a perfect fit. After any lapping, all the lapping compound must be cleaned away to restore the metal-to-metal fit.
I'm not sure you'll need this last step, because 1) I haven't seen the cleaned up crankshaft, and 2) because you have the alternator center bolt to help the pieces stay together. But it's an option.
And since the refinished taper will be working at a reduced surface area (grip), the center bolt had better stay tight this time !! This project is definitely not a novice job, but due to the long hours is definitely not a shop job either. You're going to need experienced help and lots of time. Good luck and we'd like to hear how it turns out.
Hope this helps.
Owning an old Airhead is easy.
Keeping an old Airhead running great is the true test.
Advertisement
